The main application menu serves as the central hub for managing your projects and configuring the application. Opening this menu will temporarily replace the standard workspace, including the Application Network and viewers, with a dedicated interface for file management, options, and project oversight. The Menu defaults to the Info screen, which provides an at-a-glance summary of your current project’s metadata and saved state.
Accessing the Menu
To open the menu, click the Show Menu button in the Main Toolbar.
Menu Screens
The navigation bar on the left side of the menu allows you to switch between several screens, each with a specific function.
Option
Description
Return to Application
Located at the top of the navigation bar, this button closes the menu and takes you back to your main workspace.
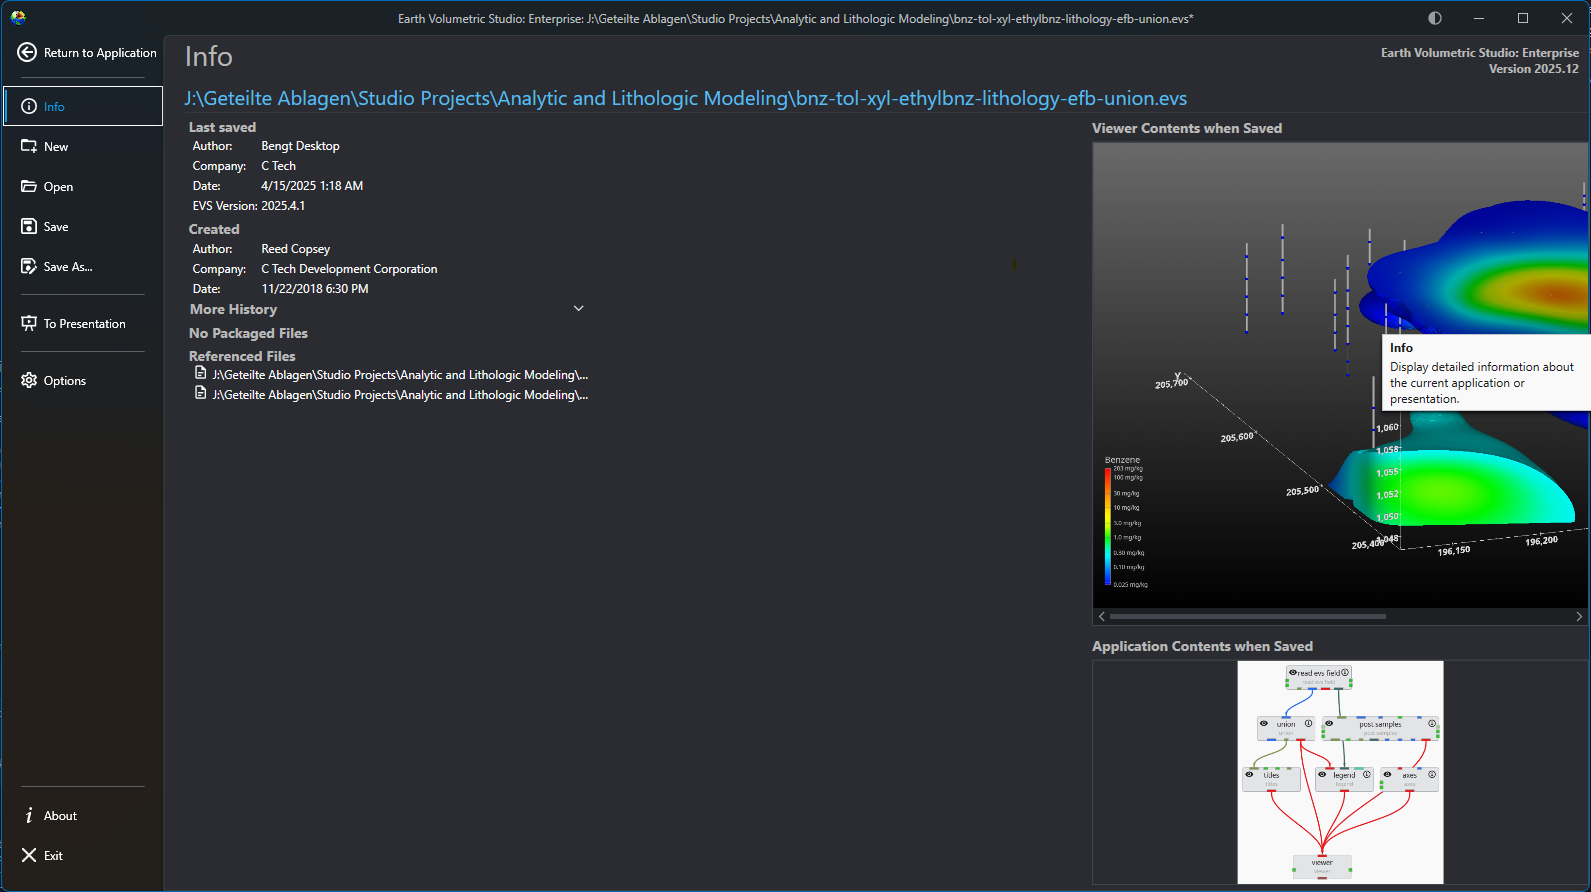
Info
The default screen, which serves as a dashboard for your current project. It displays important metadata (author, save date, version, etc.) and shows preview images of the Viewer Contents and Application Contents from the last save.
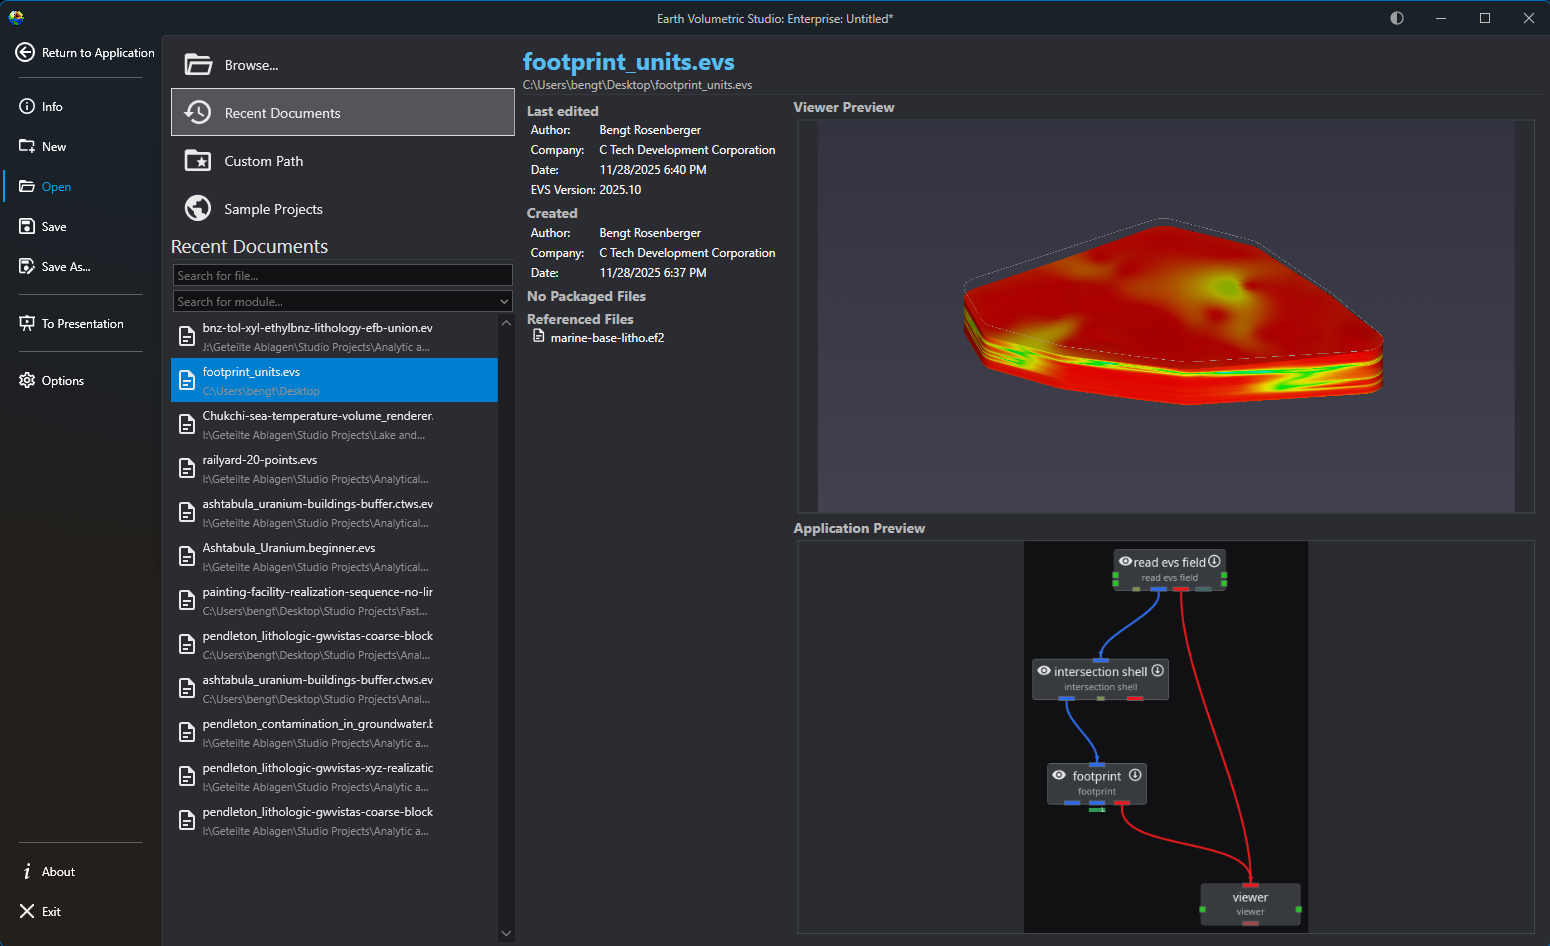
Opening Projects The Open screen, accessible from the main application Menu, provides a comprehensive interface for loading existing projects. It is designed to give you quick access to your recent work, sample files, and any project on your system, complete with metadata and visual previews to help you find the right file quickly.
The Operation and User Preferences window is the central hub for configuring application-wide settings in Earth Volumetric Studio. It allows you to customize the user interface, set default behaviors for new projects, manage system resources, and personalize user information. Tailoring these settings can significantly improve your workflow and efficiency.
To access this window, click the Options button on the main application menu located on the left side of the screen.
Earth Volumetric Studio features a flexible interface composed of several windows. You can customize their size, position, and docking state to create
Subsections of Menu
Opening Projects
The Open screen, accessible from the main application Menu, provides a comprehensive interface for loading existing projects. It is designed to give you quick access to your recent work, sample files, and any project on your system, complete with metadata and visual previews to help you find the right file quickly.
File Access Options
Option
Description
Browse…
Launches your operating system’s standard file explorer, allowing you to navigate your entire file system (local drives, network locations, etc.) to locate and open any .evs project file. This is ideal for accessing files not in your recent list or usual project folders.
Info
While applications on network drives or shared drives may load, our customers often experienced file locking or similiar access issues when saving them. For the best experience, we recommend loading applications from a local filesystem if possible.
|
| Recent Documents | The default view, offering the quickest way to resume work. It presents a scrollable and searchable list of your most recently accessed projects, ordered from newest to oldest. |
| Custom Path | Acts as a configurable bookmark for frequently used folders. Once you set a directory in the application’s options, this button lists all application files in that location, saving you from navigating to it manually.
Note: The Custom Path option will not recurse subdirectories. Only application files directly in the favorited directories will be shown. |
| Sample Projects | Provides access to a curated collection of official C Tech sample applications that demonstrate best practices and diverse capabilities. These are the applications used in the EVS Training tutorials.
Note: If this list is empty, the C Tech Sample Applications have not been installed. You can obtain the installer from the C Tech website at www.ctech.com. |
Filtering and Searching
When using the open file views, you can use the search and filter boxes to quickly locate a specific project. These tools are especially useful when dealing with a long list of files.
Tool
Description
Search for file…
This text box allows you to filter the list by filename. As you type, the list dynamically updates to show only the files whose names contain the text you have entered.
Search for module…
This dropdown helps you find projects based on their content. Selecting a module type will filter the view to show only application files containing that module. This is useful for finding examples or projects when you remember a key component but not the file name.
Project Information and Preview
When you select a file, the right-hand side of the screen populates with detailed information about that project.
Panel
Description
Metadata Panel
At the top, you will find key details about the file. This includes when it was last edited and by whom, its creation date, the software version used, and (for applications saved in recent releases) a list of any external files it references and any packaged data in the application.
Viewer Preview
This panel displays a static image of the 3D viewer’s contents as they appeared the last time the project was saved. This gives you an immediate visual reminder of the project’s output.
Application Preview
Below the viewer preview, a snapshot of the application network is shown. This allows you to see the module layout and connections, providing insight into the project’s workflow and structure.
The Operation and User Preferences window is the central hub for configuring application-wide settings in Earth Volumetric Studio. It allows you to customize the user interface, set default behaviors for new projects, manage system resources, and personalize user information. Tailoring these settings can significantly improve your workflow and efficiency.
To access this window, click the Options button on the main application menu located on the left side of the screen.
The window is divided into several logical sections, each handling a different aspect of the application’s configuration.
The options on the left side are all user preferences, and determine the look, feel, and operation of EVS for the current user. The options on the right side change the default values used for new modules and applications.
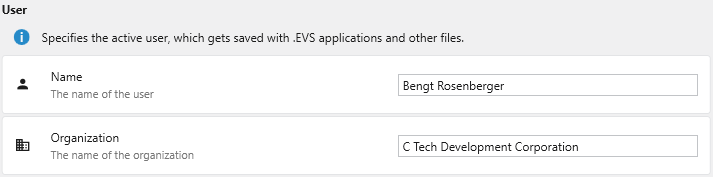
User
This section specifies the active user and their organization. This information is saved with .evs application files and other outputs, helping to track authorship and ownership of projects.
Setting
Description
Name
The name of the primary user. This name is stored as metadata within your project files.
Organization
The name of your company or organization. This is also saved as metadata for project management and collaboration.
System
The System section controls settings that impact the core operation of EVS system-wide, including file handling, hardware utilization, and integration with external tools like Python.
Setting
Description
Open EVS Files With Existing Instance
When enabled, any .evs file you open from Windows File Explorer will launch within the currently running instance of Earth Volumetric Studio. If disabled, a completely new instance of the program will be launched for each file.
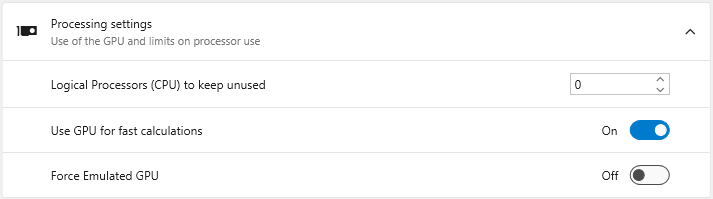
Processing settings
This section allows you to manage how EVS utilizes your computer’s hardware.
**Logical Processors (CPU) to keep unused**: Reserves a specific number of your CPU's logical processors (cores/threads) for the operating system and other applications. This prevents EVS from consuming 100% of your CPU during intensive calculations, keeping your system responsive.
**Use GPU for fast calculations**: When enabled, EVS leverages your graphics processing unit (GPU) to accelerate certain calculations. It is recommended to keep this enabled if you have a dedicated graphics card.
**Force Emulated GPU**: An advanced troubleshooting setting. It forces EVS to use a software-based GPU emulator instead of your physical graphics card, which can help diagnose graphics-related issues but at a significant performance cost.
|
| **Use Custom Python Installation** | Enable this toggle to use a specific Python installation on your system, rather than the one bundled with EVS.
NOTE: A restart of EVS is required for this change to take effect. |
| **Custom Python Install** | When "Use Custom Python Installation" is enabled, this field becomes active. Specify the path to the root directory of the desired Python installation. EVS must be restarted after changing this path. Any Python 3.10-3.13 installation will be detected and work, including Anaconda and similar (provided they are registered as a system Python install). Do not use Microsoft Store installed Python installations, as they are not allowed by Windows to be used by other software packages directly. |
| **Culture** | Specifies the language and regional format used throughout the EVS user interface, which affects language as well as the display of dates, times, and numbers. |
| **Custom Paths** | Define shortcuts to frequently used folders. These paths will appear directly in the **Open** menu and other file browsers, allowing you to navigate to project directories with a single click.
 |
User Interface Options
This section controls the visual appearance and layout of the EVS user interface.
Setting
Description
Theme
Choose a visual theme for the application. For more details, see the Themes topic.
Light: A bright theme with dark text.
Dark: A dark theme with light text, which can reduce eye strain.
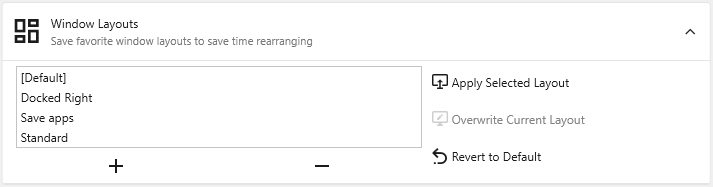
**+ / - Buttons**: Save the current window arrangement as a new layout or delete the selected layout.
**Apply Selected Layout**: Applies the window positions from the selected layout.
**Overwrite Current Layout**: Updates the selected layout with the current arrangement of windows.
**Revert to Default**: Resets the selected layout to its original state.
|
| **Ribbon Style and Density** | Customizes the appearance of the [Main Toolbar](../../main-toolbar/).
**Full Size**: The default style, featuring large icons with descriptive text.
**Comfortable**: A more compact style with smaller icons and text.
**Compact**: A minimal style with icons only.
**Display in Title Bar**: Moves the toolbar into the application's title bar to maximize vertical space.
|
| **Application Window Options** | Controls the visual complexity and behavior of module connections in the [Application](../../the-application-window/) window.

**Hide Viewer Connections**: Hides connection lines to and from Viewer modules to reduce visual clutter.
**Always Display Minor Ports**: When enabled, all module ports are visible. When disabled, less-used "minor" ports are hidden until you hover over the module.
**Connection Checking**: Determines how strictly EVS validates module connections. "Strict Checking" ensures data types are perfectly compatible.
**Connection Style**: Sets the visual style of connection lines (Curved or Straight).
**Highlight Potential Connections**: Controls which available ports are highlighted as valid targets when dragging a connection (Major Ports Only, Include Minor Ports, or None).
**Max Potential Connections**: Limits the number of potential connections highlighted at once to maintain performance.
|
| **Properties Window Options** | Customizes the behavior of the EVS Properties Window.

**Display Expert Properties**: Reveals advanced or less commonly used module parameters.
**Always Show Critical Properties**: Ensures that important parameters are always visible, even if their category is collapsed.
**Automatically Collapse Categories**: When enabled, all property categories collapse when you select a new module.
|
| **Module Window Options** | Options specific to the EVS [Module Library](../../the-application-window/module-library/) window.

**Include Deprecated Modules**: Shows older modules kept for backward compatibility.
**Automatically Collapse Module Categories**: When enabled, all module categories in the Module Library will be collapsed by default.
|
New Module and Application Default Settings
This area defines the default settings that are applied to new applications, modules, and data processing tasks.
New Application Defaults
Setting
Description
Z Scale
Sets the default vertical exaggeration (Z-Scale) for new applications.
Explode
Sets the default explode factor for new applications, which pushes modules apart in the 3D viewer.
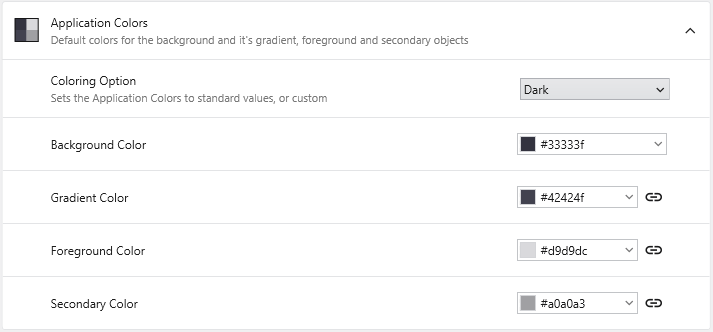
Application Colors
Sets the default colors for elements in the Viewer window for new applications.
**Coloring Option**: Select from predefined color schemes (Light, Dark) or choose "Custom" to enable the color pickers below.
**Background Color**: Sets the solid background color of the Viewer.
**Gradient Color**: Creates a two-color vertical gradient with the Background Color.
**Foreground Color**: Defines the default color for text, axes, and other primary annotations.
**Secondary Color**: Defines the default color for less prominent visual elements.
|
Module Defaults
Setting
Description
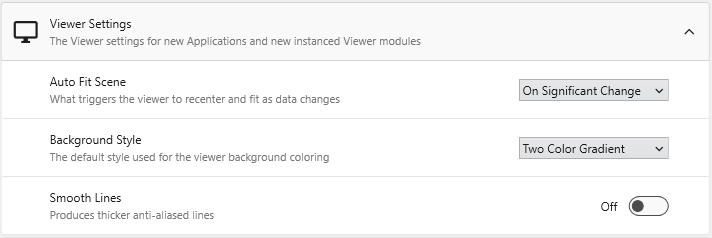
Viewer Settings
Defines the default rendering and behavior for new Viewer modules.
**Auto Fit Scene**: Controls when the viewer automatically rescales to fit all objects (On Significant Change, On Any Change, or Never).
**Background Style**: Sets the default background rendering style (Two Color Gradient, Solid, or Vignette).
**Smooth Lines**: When enabled, applies anti-aliasing to produce thicker, smoother lines.
|
| **Text and Font Settings** | Controls the default font settings for new modules that display text.

**Default Font**: Sets the default font family for text in new modules.
**Force True Type Fonts**: When enabled, forces modules to use scalable TrueType fonts.
**Include Language Specific Fonts**: Loads additional font sets for displaying characters from non-Latin languages (e.g., Chinese, Japanese, or Korean).
|
Model Generation Defaults
Provides fine-grained control over the default parameters used in modules for gridding, data processing, and statistical estimation.
Setting Area
Description
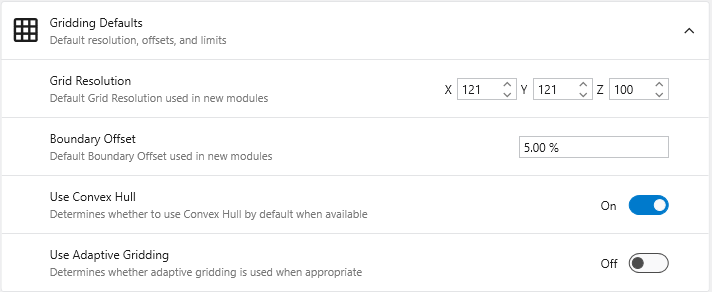
Gridding Defaults
Defines the default settings for new gridding modules like krige_3d.
**Grid Resolution**: Sets the default number of nodes in the X, Y, and Z dimensions.
**Boundary Offset**: Defines a default percentage to expand the grid boundary beyond the input data extents.
**Use Convex Hull**: When enabled, automatically uses the convex hull of the input data as the gridding boundary.
**Use Adaptive Gridding**: When enabled, uses adaptive gridding techniques by default.
|
| **Data Processing Defaults** | Changes the default data processing options in various modules.
**Pre Clip Minimum**: Sets the default minimum clipping value applied to data **before** interpolation.
**Post Clip Minimum**: Sets the default minimum clipping value applied to data **after** interpolation.
|
| **Estimation Defaults** | Defines the default parameters for estimation modules.

**Horizontal Vertical Anisotropy**: Sets the default ratio of horizontal to vertical anisotropy.
**Use all samples if # samples below**: When enabled, the module uses all data samples for estimation if the total count is below the specified limit.
**Number of Points**: Specifies the number of nearby data points to use for estimation.
**Statistical Confidence Tolerance**: Sets the default tolerance for statistical confidence when data processing is "Linear".
**Statistical Confidence Factor**: Sets the default factor for statistical confidence when data processing is set to "Log Processing".
**Confidence for Min and Max Plume**: Sets the default statistical confidence level for determining plume extents.
|
Reset All Options
The Reset All Options button at the bottom of the window reverts all settings to their original factory defaults. This action is irreversible and affects all sections, so it should be used with caution.
Earth Volumetric Studio features a flexible interface composed of several windows. You can customize their size, position, and docking state to create a layout that suits your workflow.
Customizing Your Workspace with Window Layouts
EVS provides a flexible windowing system that allows you to customize the layout of your workspace. You can control the position, size, grouping, and visibility of most windows to suit your workflow. These customized layouts can be saved and reloaded, which is useful for different tasks or screen resolutions.
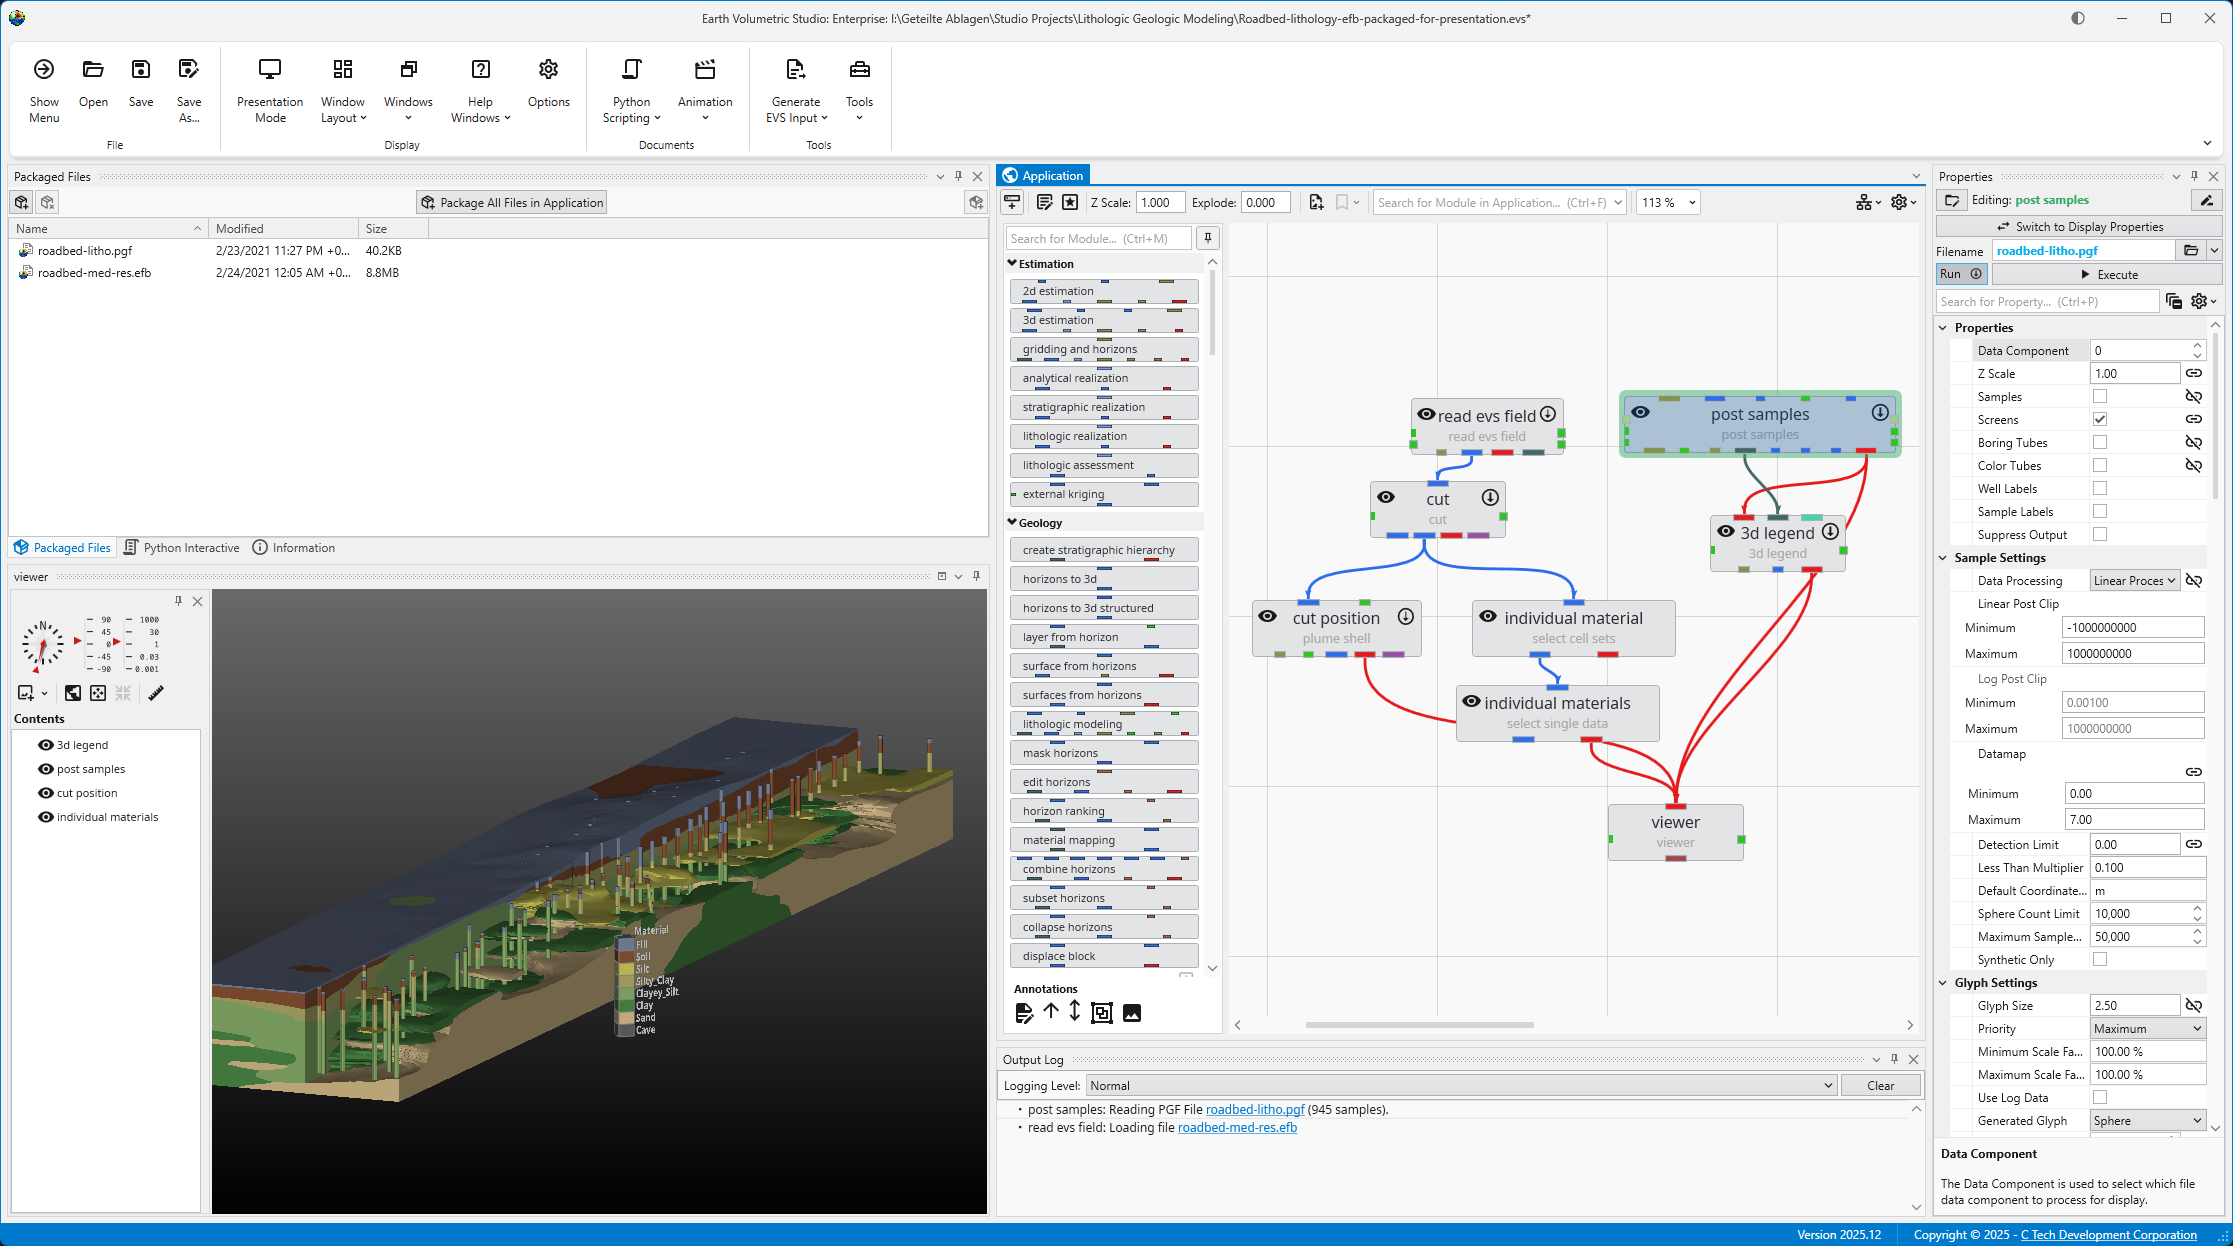
For example, here is an application with a personalized window layout:
Window Visibility and Docking
You can manage window visibility and docking using the controls located on each window’s title bar. While most windows can be moved, resized, or closed, there are a couple of exceptions:
Application Window: The main area for adding and connecting modules is always part of the main EVS application window, except in EVS Presentations or when working in Presentation mode.
Viewer Window: The Viewer cannot be closed, but it can be undocked and moved to another monitor for a multi-screen setup.
Example: Optimizing for a Larger Viewer
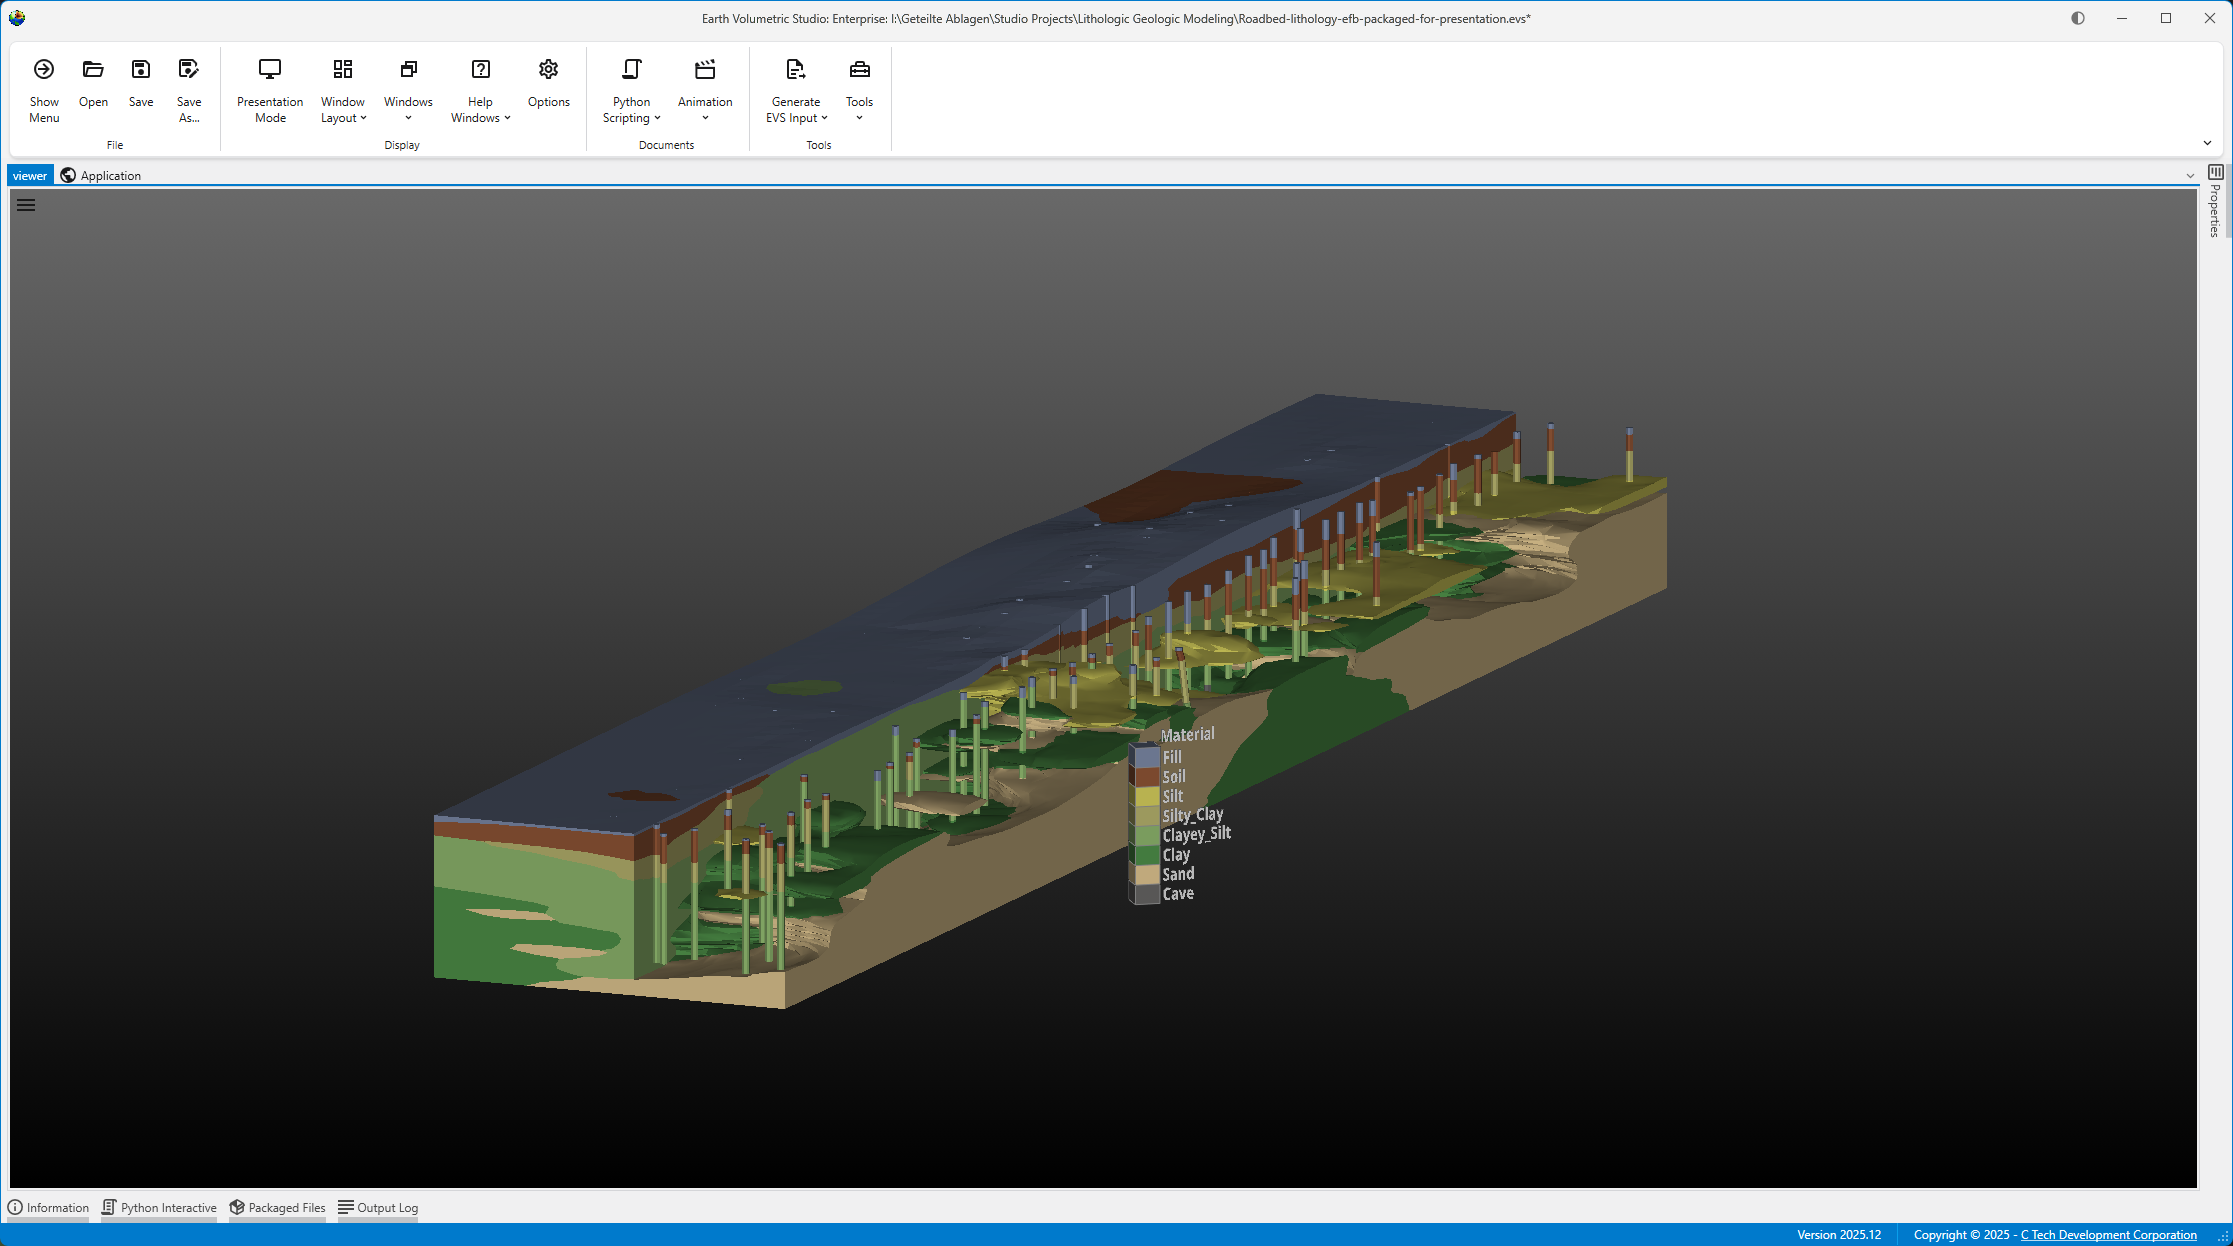
You can create different layouts to optimize your workspace. For instance, the layout below is configured to maximize the Viewer’s screen space. Notice how windows are tabbed together to save space:
The Application and Viewer windows are tabbed, with the Viewer active.
The Information, Packaged Files, and Output Log windows are tabbed, with the Output Log active.
Saving a Custom Window Layout
Once you have arranged the windows to your liking, you can save the layout for future use.
In the Options window, expand the Window Layouts section.
Here you have the option to create a new layout or overwrite the currently active layout.
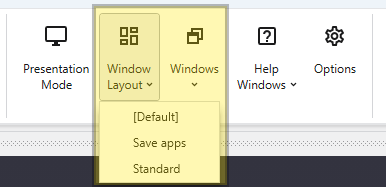
Create a new layout: Click the + (Add) button to save your current window arrangement as a new layout. It will appear in the list along with any previously saved layouts and the “Default” configuration.
Overwrite the current layout: Click the Overwrite Current Layout button.
Loading or reverting a Custom Window Layout
There are two ways to switch to a different layout.
The Options window
You can load a previous or revert a layout in the same section as described above.
In the Options window, expand the Window Layouts section.
Here you have the option to load a layout or revert to the “Default” layout.
Load a layout: Select the desired layout and click the Apply Selected Layout button or alternatively revert to the “Default” layout using the Revert to Default button.
Revert to default: Click the Revert to Default button to revert the current layout to the one saved as “Default”.
The Quick Access Button
You can easily switch between your saved layouts directly from the Main Toolbar.