Getting Started with the EVS User Interface
The main window is organized into five primary sections in the default layout configuration, each designed to provide a streamlined workflow for your data processing, visualization, and analysis needs. Most windows can be freely docked or undocked in any configuration and layouts can be loaded and saved.

1. Main Toolbar
The Main Toolbar is the row of icons at the top of the window that provides immediate access to essential commands. It is designed to help you manage your projects and control your application workflow efficiently. From here, you can perform file management tasks like opening and saving EVS applications. You can also control visual aspects of the UI by loading layouts and hiding or showing individual windows. The toolbar also includes access to automatisation through Python scripting or animations and several input file creation options.
2. Viewer
The Viewer is your primary window for 3D visualization, displaying the output of your data processing networks. It offers a suite of tools for interacting with your model. You can intuitively rotate, pan, and zoom to inspect your model from any angle. The Viewer provides dedicated controls to switch between standard viewing angles or to set a precise camera azimuth and inclination. A scene tree allows you to toggle the visibility of individual model components, helping you focus on specific parts of your data. You can also access built-in measurement tools to calculate distances directly within the 3D scene. For reports and presentations, you can capture and export the current view as high-resolution images or animations.
3. Application Window
The Application Window is a dynamic, node-based workspace where you construct your data processing pipelines. This visual programming environment, often called a “pegboard,” is central to the EVS workflow. You can drag and drop modules from the module library onto this canvas, where each module represents a specific function like data input, filtering, or visualization. To create complex workflows, you draw connections between modules to define the flow of data from inputs through various processing steps to the final outputs. The connection style can be customized to use either curved or straight lines. You can also organize and group modules to create logical and readable application networks.
4. Properties Window & Application Properties
This multi-functional section allows you to configure every aspect of your project. When a module is selected in the Application Window, this panel displays all of its configurable parameters, allowing you to control how it processes data. You can also modify global settings that affect the entire project, such as adjusting the vertical exaggeration with z-scale or separating objects for better visibility with an explode factor. This area also lets you save and manage specific camera positions as bookmarks, enabling you to quickly return to important views. The Application Favorites allows you to build a custom collection of frequently used or important module and application properties.
5. Output Log, Information, and Python Interactive Panel
This tabbed panel at the bottom of the screen provides critical feedback, logs, and advanced scripting capabilities. The Output Log displays the information your modules provide, along with execution warnings and errors. The Information tab provides details about probed locations or objects and the data at the probe point. For advanced users, the integrated Python Interactive Panel offers a full scripting console to programmatically control the EVS application, manipulate data, and extend the built-in functionality.
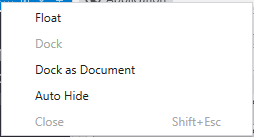
The application’s user interface is highly customizable, allowing you to arrange tool windows like the Viewer, Properties, and Application Network to best suit your workflow. Windows can be “docked” to the edges of the main application or other window, grouped with other windows in tabs, or “floated” as independent windows on your desktop. This flexibility enables you to create a personalized layout that keeps the tools you need most frequently within easy reach.