The application’s user interface is highly customizable, allowing you to arrange tool windows like the Viewer, Properties, and Application Network to best suit your workflow. Windows can be “docked” to the edges of the main application or other window, grouped with other windows in tabs, or “floated” as independent windows on your desktop. This flexibility enables you to create a personalized layout that keeps the tools you need most frequently within easy reach.
Window Title Bar and Context Menu
Each tool window has a title bar containing several controls for managing its state. You can access these functions by right-clicking the title bar or by using buttons provided on the title bar directly.

Undocking and Floating Windows
A floating window is one that is detached from the main application window and can be moved freely around your screen, even to a second monitor. To make a window float:
- Drag the Title Bar: Click and hold the title bar of any docked window and drag it away from the edge. As you drag it towards the center of the screen, it will detach and become a floating window.
- Drag the Tab: For windows docked as tabs in same pane as other windows, drag the window by its tab.
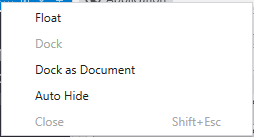
- Use the Context Menu: Open the window’s context menu and select the Float option. The window will immediately detach from its docked position.
Docking Windows
To dock a floating window, simply drag it by its title bar. As you move it over the main application window or any floating window, a set of docking guide icons will appear. Dropping the window onto one of these icons will dock it to the corresponding location.
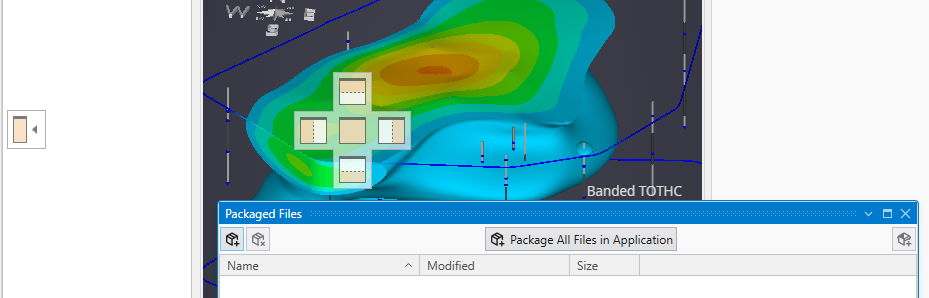
- Edge Docking: The four arrow icons at the edges of the screen will dock the window to the top, bottom, left, or right side of the main application, spanning its full width or height.
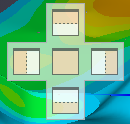
- Pane Docking: The five-icon control that appears in the center of an existing window pane allows for more precise placement. The four outer arrows will dock the window to the side of that specific pane, creating a split view. The center icon will dock the window as a new tab within that pane group.
- Document Area: One pane is designated as the central document area. It occupies the main, central space of the application window. The other docking guides for top, bottom, left, and right positions are usually arranged around this central area.
- Context Menu Docking: You can also use the context menu of a floating window. Dock will typically return it to its last docked position, while Dock as Document will place it as a tab in the central document area.
Note: The Application window is the central point of any EVS application and layout. It can only be either docked in the Document Area or made a floating window.
Auto-Hiding Windows (Pinning)
The Auto-Hide feature allows you to keep windows accessible without them permanently taking up screen space. You can control this using the pin icon in the window’s title bar or the Auto Hide option in the context menu.
- Pinned (Vertical Pin): When the pin icon is vertical, the window is pinned open. It will remain visible in its docked location.
- Unpinned / Auto-Hidden (Horizontal Pin): When the pin icon is horizontal, the window is set to auto-hide. It will collapse into a named tab on the edge of the window. To temporarily view it, simply hover your cursor over its tab. It will slide out for you to use and slide away again when you move your cursor off it. To keep it open, click the pin icon to return it to the pinned state.
Saving and Loading Layouts
When you created a layout you like, you can save it through the Options in the Menu. Layouts can be switched to previously saved ones through either the Menu or the Window Layouts button in the Main Toolbar.