Subsections of C Tech 3D PDF Converter Help
INSTALLATION:
Enterprise License Customers please see this topic, all other users continue below
Run the installer CTech3DPDFConverter.exe. Download the latest version from ctech.com/downloads.
Upon completion of the installation, run the C Tech 3D PDF Converter program.
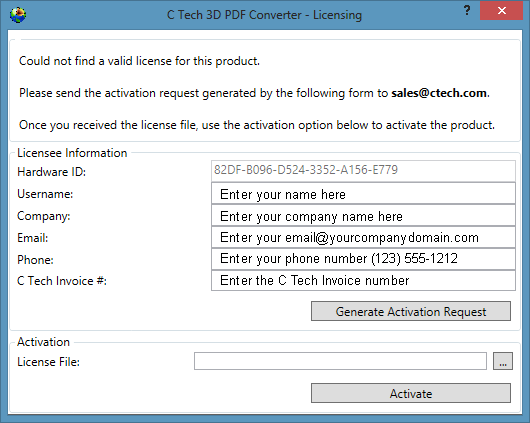
If no license exists, the program will automatically open the Licensing window shown below.
You must contact C Tech to purchase a license before an Activation Request can be processed.
- The Licensee Information must list the C Tech Invoice number in order to be processed.
- The Hardware ID is automatically populated when you run the Licensing tool.
- Please fill out all portions completely. If your information does not precisely match the information on the referenced invoice, we cannot process the license.
- Be sure to request a license from the computer you wish to license.
- The Activation must be done when logged in as the end user who wants to run the C Tech 3D PDF Converter
- Only CPU locked (fixed) licensing is available for this product for non-Enterprise customers.
After entering your personal Licensee Information, click on the Generate Activation Request, it will create a file with a .CAR suffix which must be emailed to sales@ctech.com
Info
It may take up to 2 business days before we reply with a license file.
Upon receiving the license file (.lic suffix) from C Tech, run CTech3DPDFConverter.exe again, load the license file and click on Activate
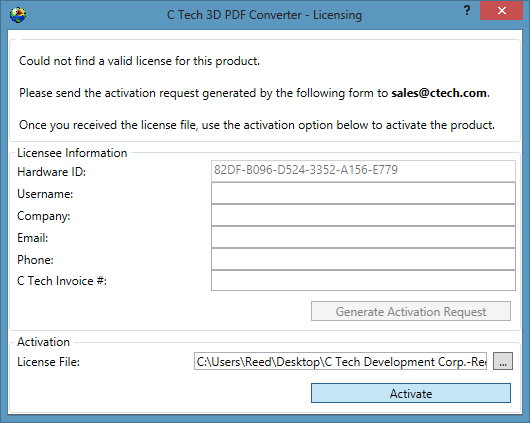
You should see:

Be sure to learn about Optimizing 3D PDF Playback in Adobe Reader or Acrobat
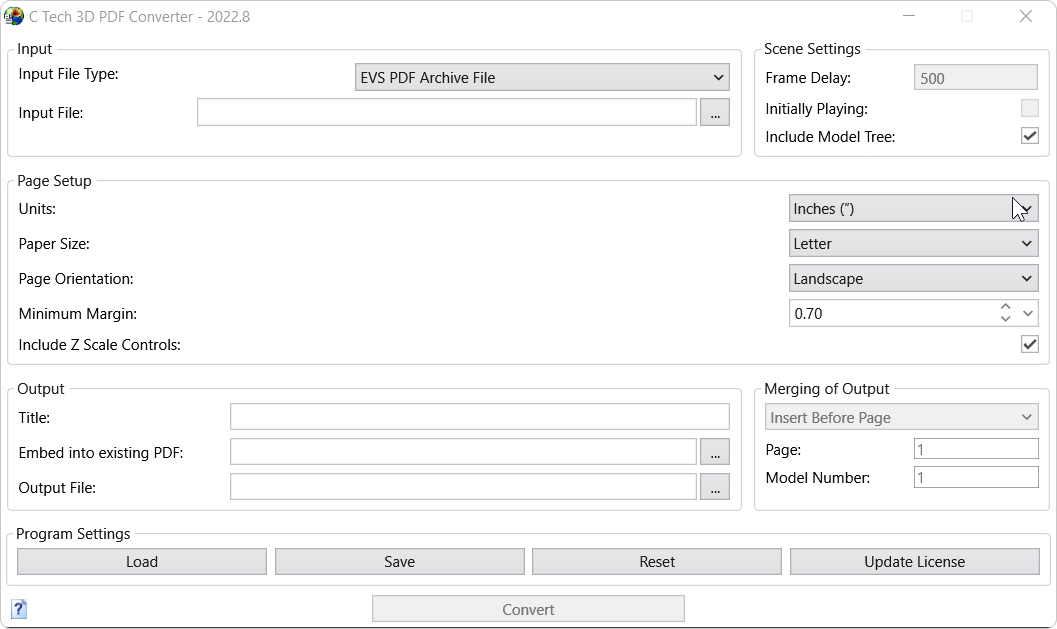
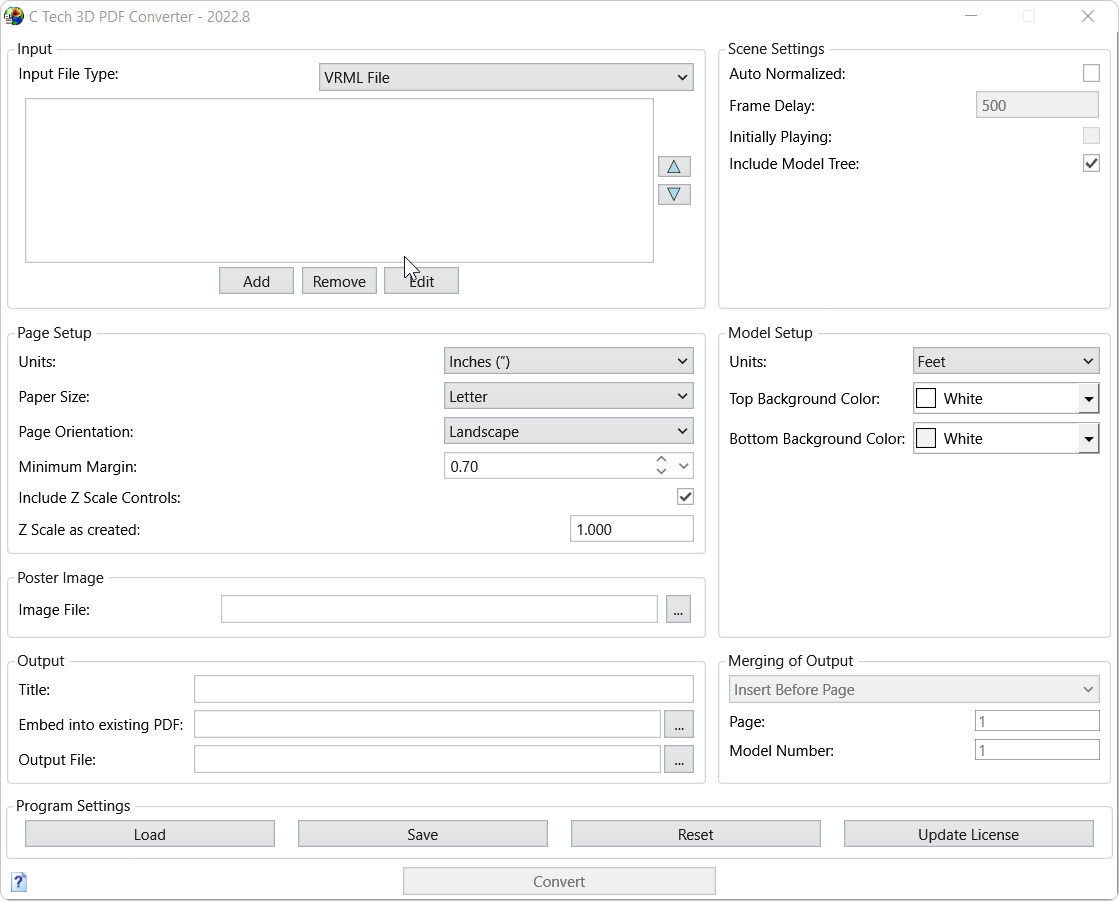
After successful licensing, when you run CTech3DPDFConverter.exe you will see the main window:
These instructions only apply to Enterprise Program customers who have paid for the PDF Converter Unlimited Add-On.
IT PERSONNEL:
Before proceeding you must have the following software versions installed on servers and client computers:
You must have the latest version of the C Tech PDF Converter — download from ctech.com/downloads
You must have the latest version of the C Tech License Manager on all EVS Client computers with 3D PDF users — download from ctech.com/downloads
You must have the latest version of the C Tech Universal License Server on all EVS servers which will support 3D PDF users — download from ctech.com/downloads
These instructions apply only for customers who have received EVS Key updates after June 1, 2022
- If you have a current Enterprise License Subscription, you may request new key updates for the 3D PDF Converter from sales@ctech.com
If the user will be an EVS user also, please complete the EVS Enterprise License Client installation first.
Run the installer CTech3DPDFConverter.exe.
Upon completion of the installation, run the C Tech 3D PDF Converter program.
- If EVS is installed, configured and operating, the PDF Converter will open fully licensed
If the user is not an EVS user (e.g. ArcScene user only), you must install and configure the C Tech License Manager first.
- Configure the C Tech License Manager to point to one or more EVS Servers per the above instructions.
If configured correctly, the PDF Converter will not display a licensing request screen and will open fully licensed.
Warning
PDF Converter Licenses are synchronized to your Enterprise License renewal. The PDF Converter will not function if your Enterprise Subscription has expired.
You do not need to submit .CAR files for each user.
Before you can use the C Tech 3D PDF Converter, you must purchase a license, generate a license request and activate the license.
Installation is detailed here.
After successful licensing, when you run C Tech 3D PDF Converter you will see the main window shown below:

The options for conversion from .EVSPDF (or legacy VRML) files to 3D PDF are organized in Sections:
- Input Section: This section defines the input file names and settings for PDF creation
- Input File Type: The default is .EVSPDF. You can also choose .VRML if you want to convert legacy files.
- Please note that .EVSPDF files have the following advantages:
- The creation of EVSPDF files can be more than 10 times faster than VRML.
- They produce a quality Model Tree very similar to what is achieved with C Tech’s 3D Scene Viewer.
- The Title set will be used as the Title of the model tree.
- EVSPDF Files include an appropriate Poster Image, eliminating the need to separately create one.
- The background set in EVS will be inherited in the 3D PDF.
- Model Coordinate Units will be inherited in the 3D PDF.
- The model’s Z Scale will be inherited in the 3D PDF.
- Only VRML is currently supported for Animation creation in a 3D PDF, however this will change in the near future.
- You can specify one or more files as input using the Add button.
- You can also Drag-and-Drop files into the Input Files box
- When multiple files are selected, the Animation/Exploded options are enabled.
- Using the Remove, Edit and Up/Down buttons, you can change the order of multiple files.
- See the converter when VRML is selected at the bottom of this page.
- Scene Settings — Multiple Input Files: VRML ONLY
- Frame Delay: Default is 20. Smaller numbers play faster. Actual speed also depends on complexity and size (Mb) of your models.
- Initially Playing: Default is OFF. When turned on, the animation will begin playing when the PDF file is opened.
- Page Setup: This section defines the page margins, orientation
- Units: defines the units used for page size and margins. Default is inches, but millimeters are also included.
- Page Size: Select from among most standard U.S. and Metric page sizes to set the Width and Height of the page.
- Page Orientation: The default is landscape page orientation (wider than tall) or Portrait.
- Minimum Margin: The left-right and top-bottom margins are determined by the Page Size, Aspect Ratio of the Poster Image and this parameter. The relationship between these parameters is fundamentally:
- If the aspect ratio of the poster image precisely matches the chosen page size all margins will be equal and set to the Minimum Margin.
- If the aspect ratio of the poster image is more landscape than the chosen page size the left and right margins will equal the Minimum Margin and the top and bottom margins will be larger.
- If the aspect ratio of the poster image is more portrait than the chosen page size the top and bottom margins will equal the Minimum Margin and the left and right margins will be larger.
- Include Z Scale Controls: This toggle adds a Z Scale Control to the 3D PDF.
- Z Scale as Created: This is used only when the above toggle is ON and the input file type is VRML. Otherwise it is not displayed since EVSPDF files include this information.
- Model Setup
- Units: defines the units used internally in the 3D PDF. This is shown only if the input file type is VRML. Otherwise it is not displayed because EVSPDF files will set this parameter automatically.
- Top and Bottom Background Colors: Enter the desired colors here. This is shown only if the input file type is VRML. Otherwise it is not displayed because EVSPDF files automatically inherit background colors from EVS.
- Embed into Existing PDF: This is used only if you plan to Replace 3D Models. You should specify the Existing PDF (source) file here within which you want to insert a 3D model. It will make a new output file and not overwrite the Existing PDF unless the Output File has the same name.
- You can also Drag-and-Drop files into this box
- Output
- Title: The title appears in the 3D PDF Table of Contents. Titles should be less than 30 characters in length. If the Title string is blank, “EVS Scene” will be used.
- Output File: Specify the name and folder for the 3D PDF (or PRC) file. By default, this will be set to the same base file name as the EVSPDF (or first WRL) input file.
- Merging of Output — These settings determine how the 3D PDF will be included within the Existing (source) PDF.
- There are 3 merging modes:
- Insert Before — This option inserts the 3D PDF as a new page before the specified page.
- Insert After — This option inserts the 3D PDF as a new page after the specified page.
- Replace 3D Model — This option provides the ability to place a 3D PDF into pages of an existing PDF containing one or more placeholder 3D models. This is covered in detail in the Inserting Placeholder Models topic. This is the most powerful, and therefore, most complex option.
- Page: Sets the page number for the Insert at Page and Replace Annotation options
- Use Existing Page: This option applies only to the Insert at Page option above. If it is on, the 3D PDF will be placed over any content on the existing document.
- Annotation: This option applies only to the Replace Annotation option above. It determines which Annotation on the specified page is replaced.
Info
You can only replace or insert one 3D Model at a time. Multiple 3D Models require subsequent sequential operations. If your Output File doesn’t match your Existing File, you will need to read the Output File from the last operation as your new Existing File.
- Program Settings
- Load and Save: These buttons provide the ability to load and save all settings in the program including the file lists.
- Reset: Allows you to clear all settings so you can drag and drop new files and convert a different model. This is quicker than shutting down and starting a new instance of the 3D PDF Converter.
- Update License: This provides access to the licensing window used during installation. This is the process that you use to request and install an update to extend the subscription period.
- Convert: Process the input file into a 3D PDF. During conversion, this button will disappear and be replaced by a progress bar and countdown to completion.
- Help: The Help button
 is in the lower left corner. It opens this help.
 - Be sure to learn about Optimizing 3D PDF Playback in Adobe Reader or Acrobat
ISSUE: Default Adobe Reader displays yellow security warning banner for 3D PDFs.
Each individual PDF user can change local settings in the menu with:
- Go to Edit > Preferences > 3D & Multimedia and then select the Enable playing 3D content checkbox.
- For more on this subject see: Adobe Enabling 3D Content Playback
- Enterprise IT can configure the end-user settings via
HKCU\Software\Adobe\Acrobat Reader\<version>\3D\bEnable3DContent
- Enterprise IT can disable and lock 3D rendering so that the user cannot change the setting via
HKLM\SOFTWARE\Policies\Adobe\(product name)\(version)\FeatureLockDown\bEnable3D
ISSUE: Making 3D PDFs larger and/or Full Screen
There are known bugs in Adobe Reader and Acrobat for the Full Screen Multimedia option. If you right-click in the background of a 3D PDF you will see these options:
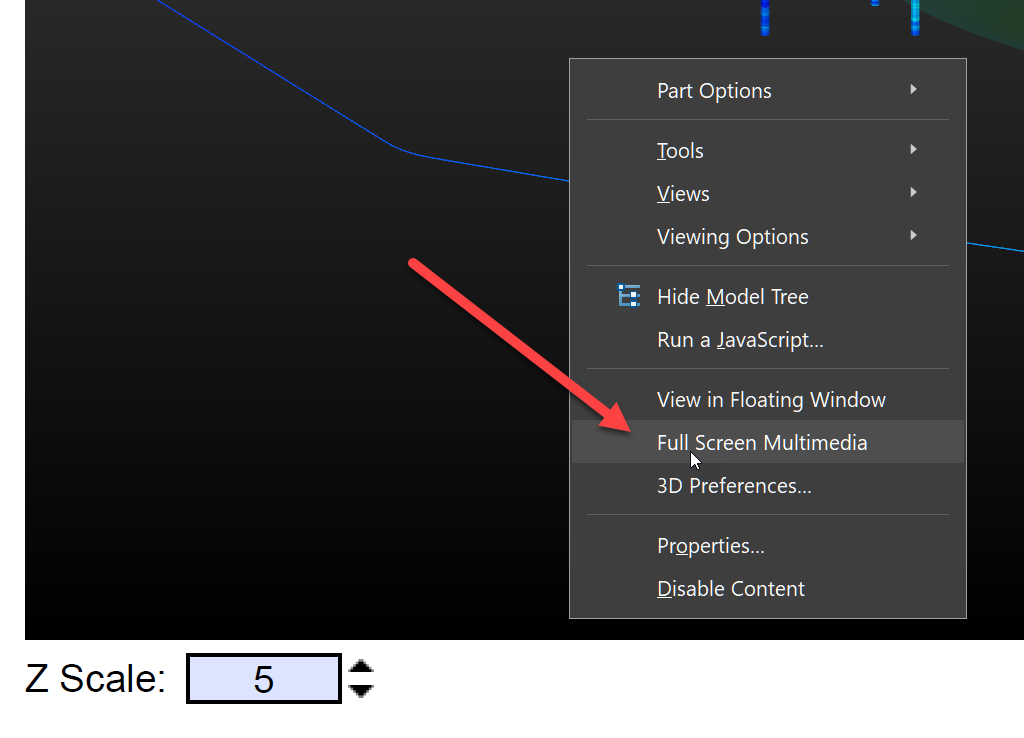
This option does not work reliably and generally causes substantial display errors. Instead we recommend this option in the View menu in Adobe Reader or Acrobat
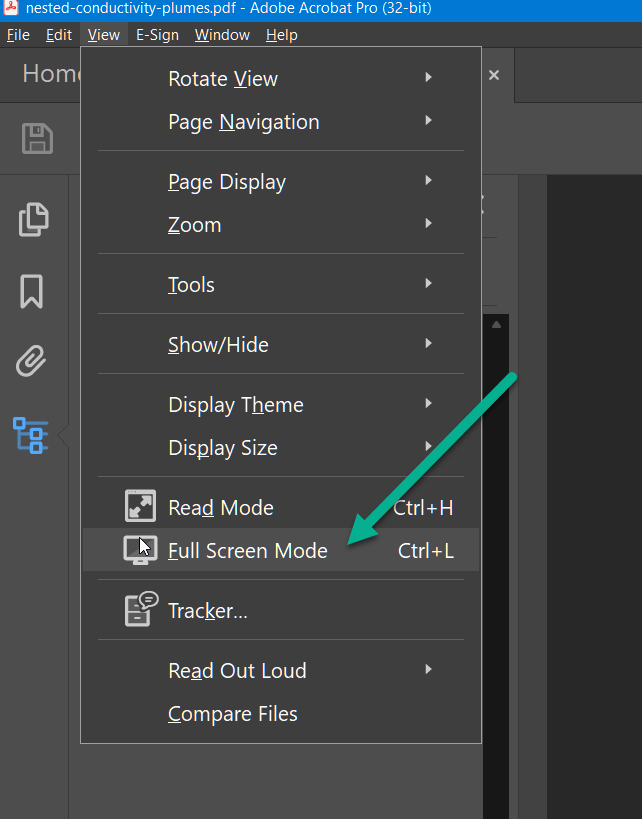
Once in this full screen mode you can further zoom on a page containing a 3D PDF if necessary.
Be sure to use Export PDF Scene in Studio.
The following is a list of guidelines that must be considered when making Earth Volumetric Studio models that will be output as 3D PDF files using the C Tech 3D PDF Converter.
Studio exports EVSPDF Files with the Export PDF Scene module. Export PDF Scene works only if you have a PDF license on the same computer or you have an Enterprise license with the PDF Converter option.
The use of VRML is not recommended because Table of Contents is poorly supported in VRML.
- Do not use the Forward Facing font option in any modules (e.g. post_samples, etc.)
- Do not use volume rendering. None of the techniques are supported.
- This includes the volume_renderer and the adjust_opacity modules.
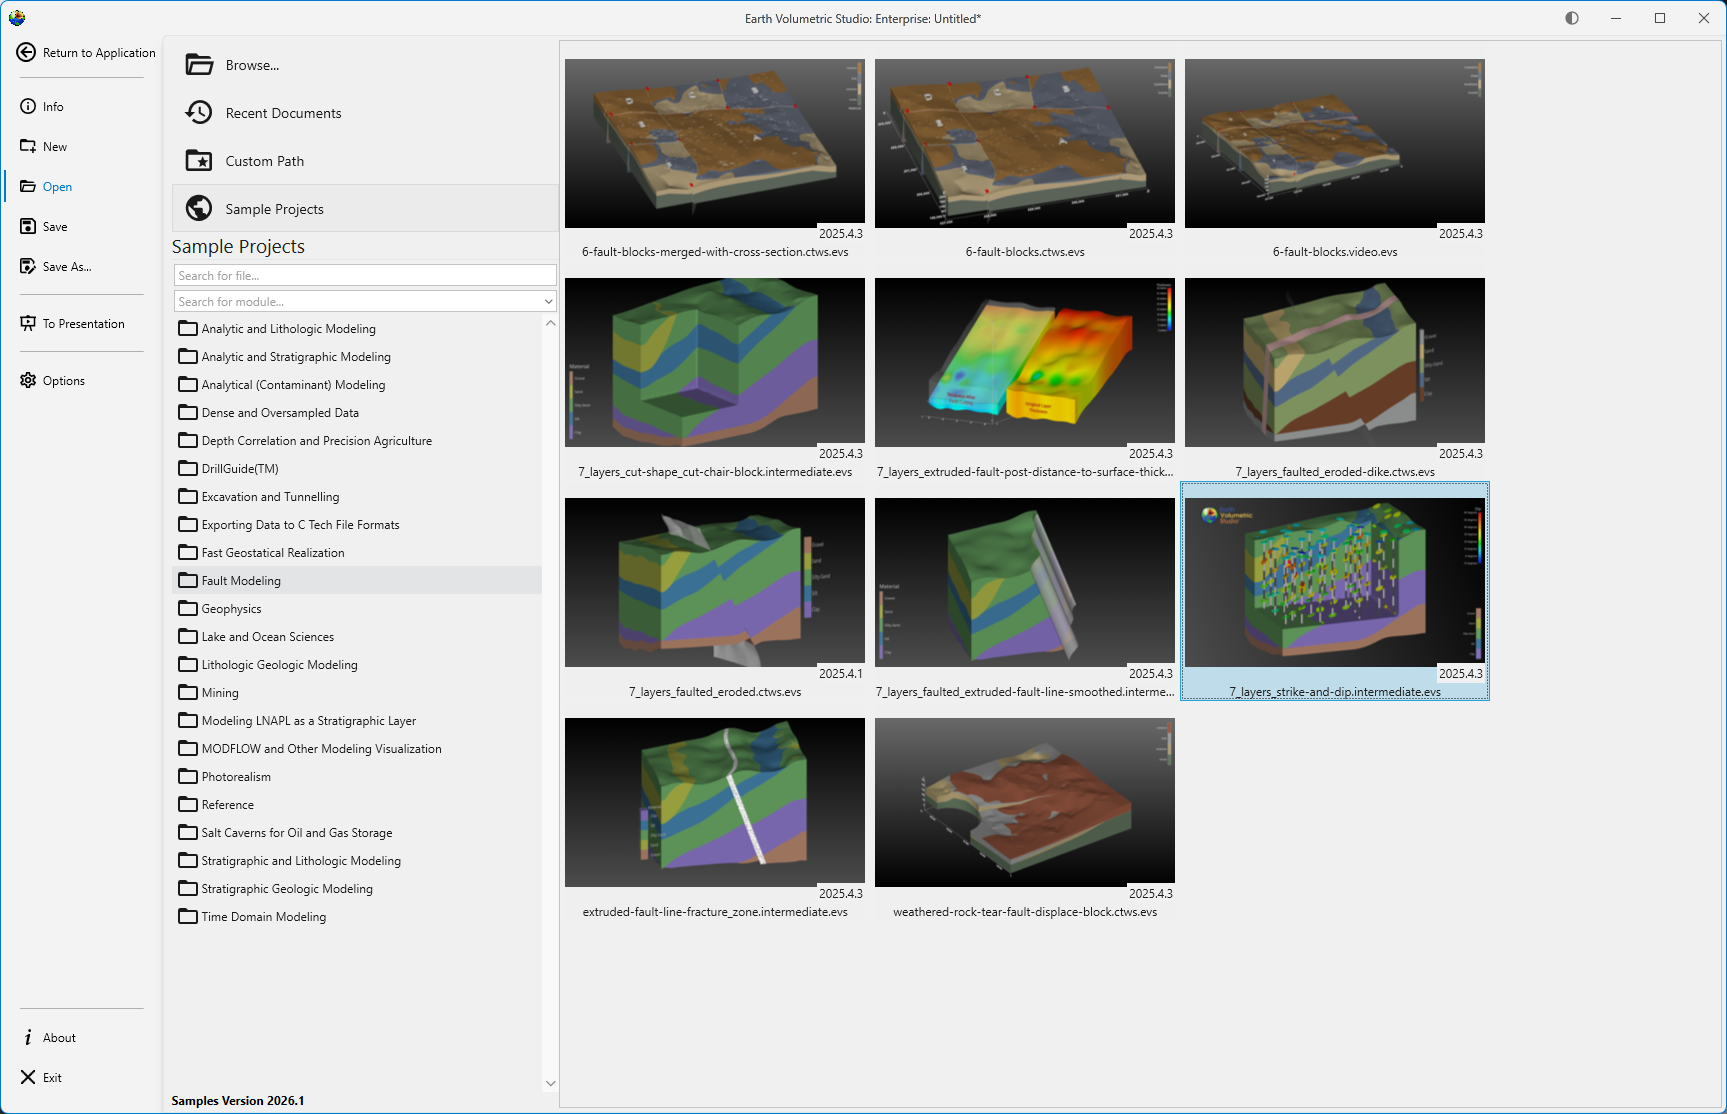
Let’s begin by loading one of the Studio sample projects:
Whose output is:
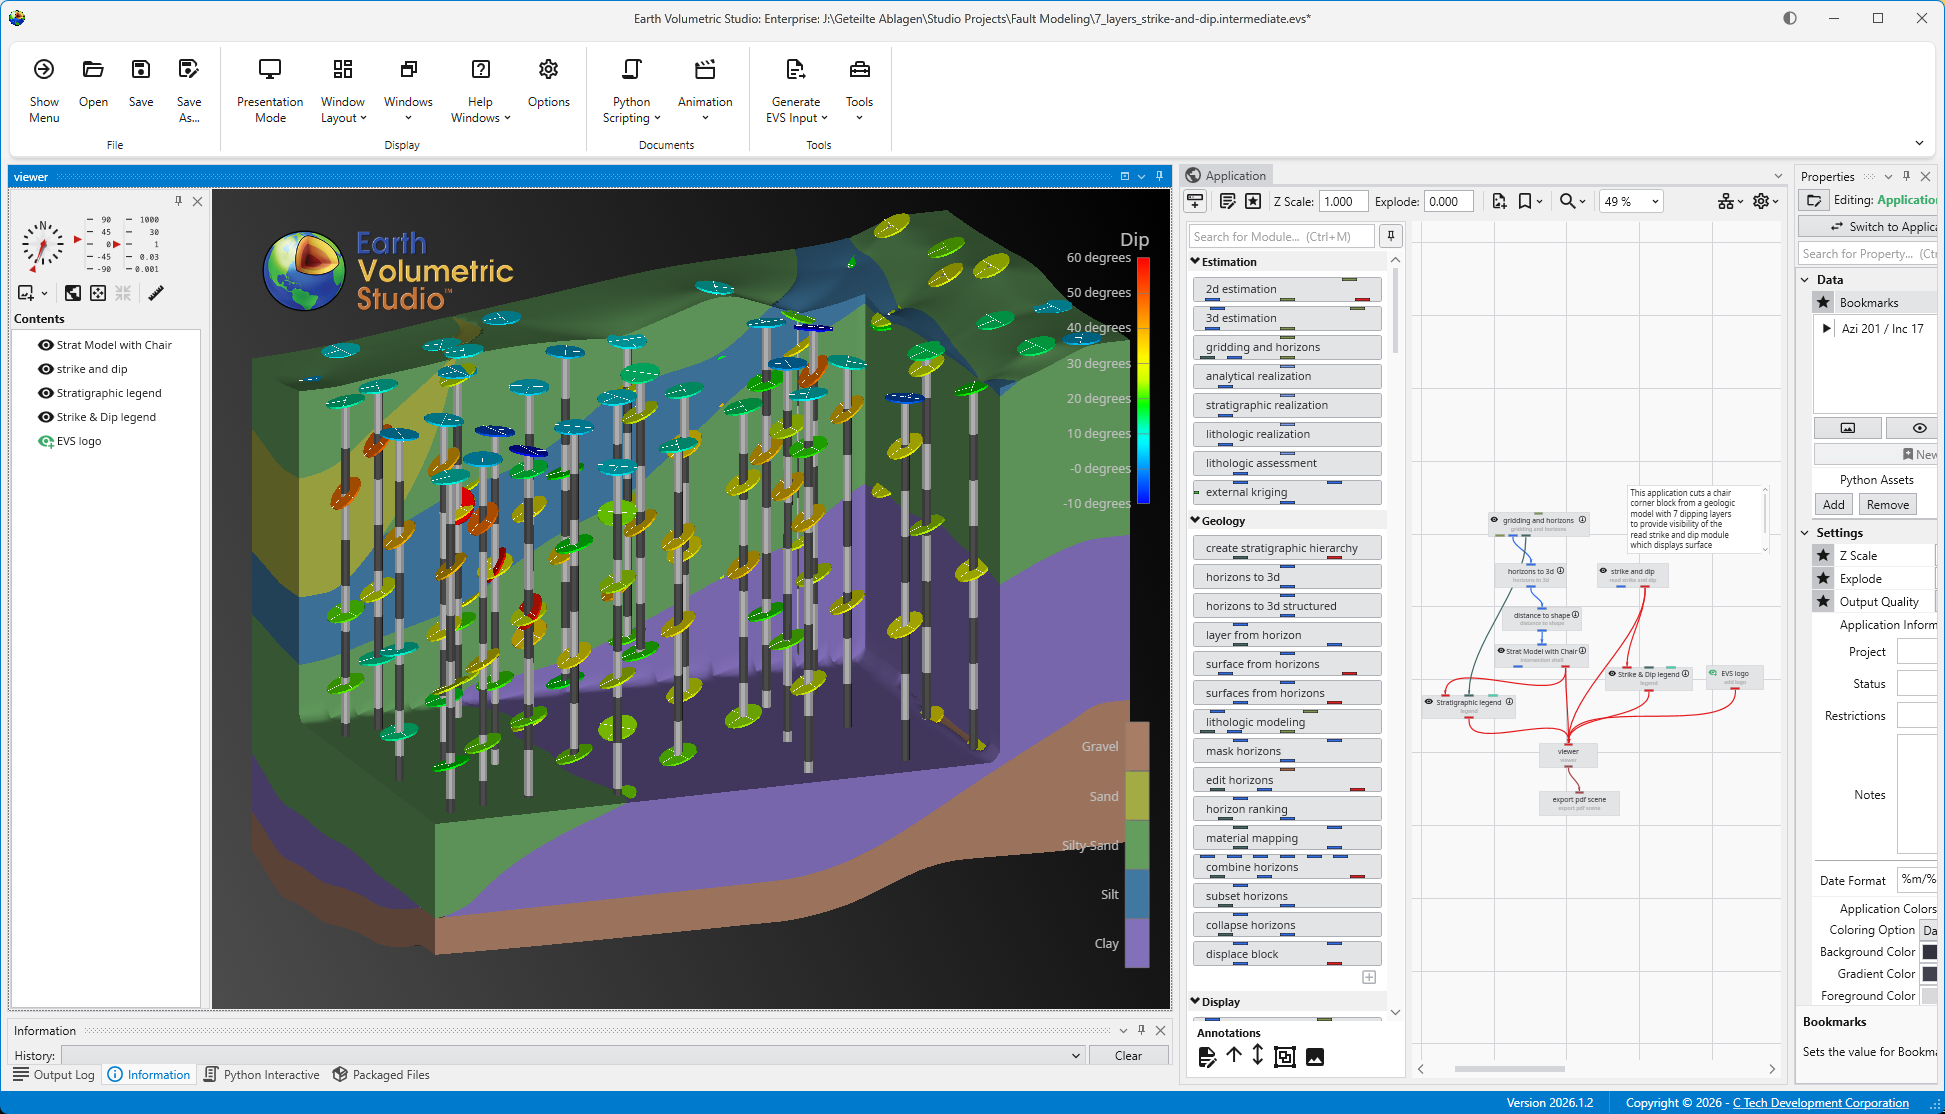
This application has two legends and a logo. This is exported to our intermediate format .EVSPDF using the export pdf scene module. When this format is used:
- The .EVSPDF file will be quickly created.
- It will build a useful Table of Contents using the names of modules connected to the viewer.
- Rename your modules to make a more informative Table of Contents
- It contains a poster image at the resolution of your viewer.
- It will inherit the Z Scale of your model so this is properly displayed in the 3D PDF.
Now we’re ready to do the conversion. Open the C Tech 3D PDF Converter.
Drag and Drop your .EVSPDF file into the Input File box. If you add a Title (which is optional) it will become the highest level object in the Table of Contents.
All other default settings will be fine.
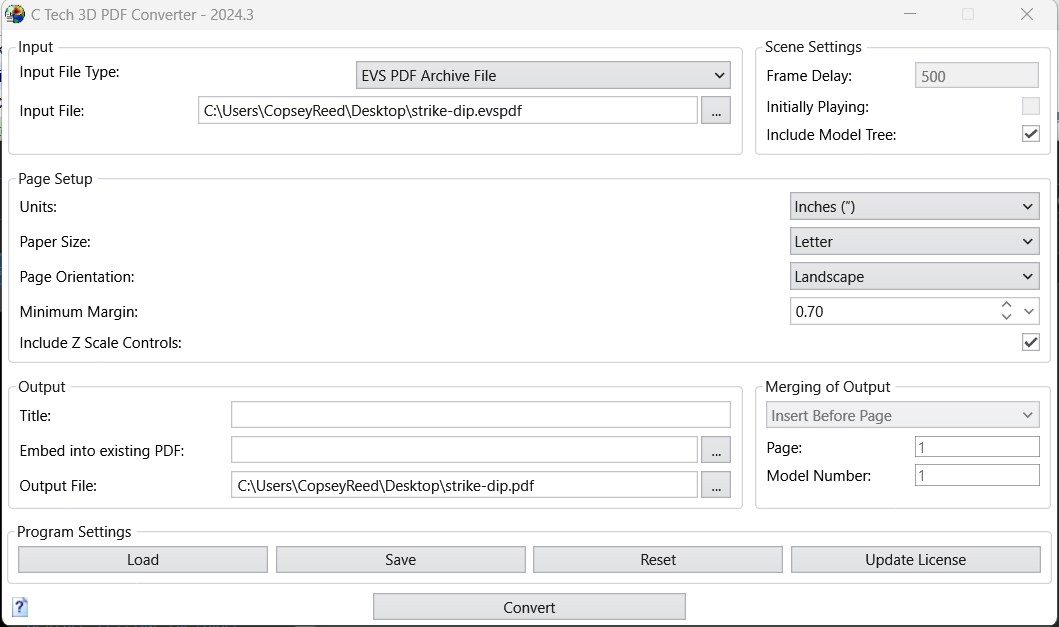
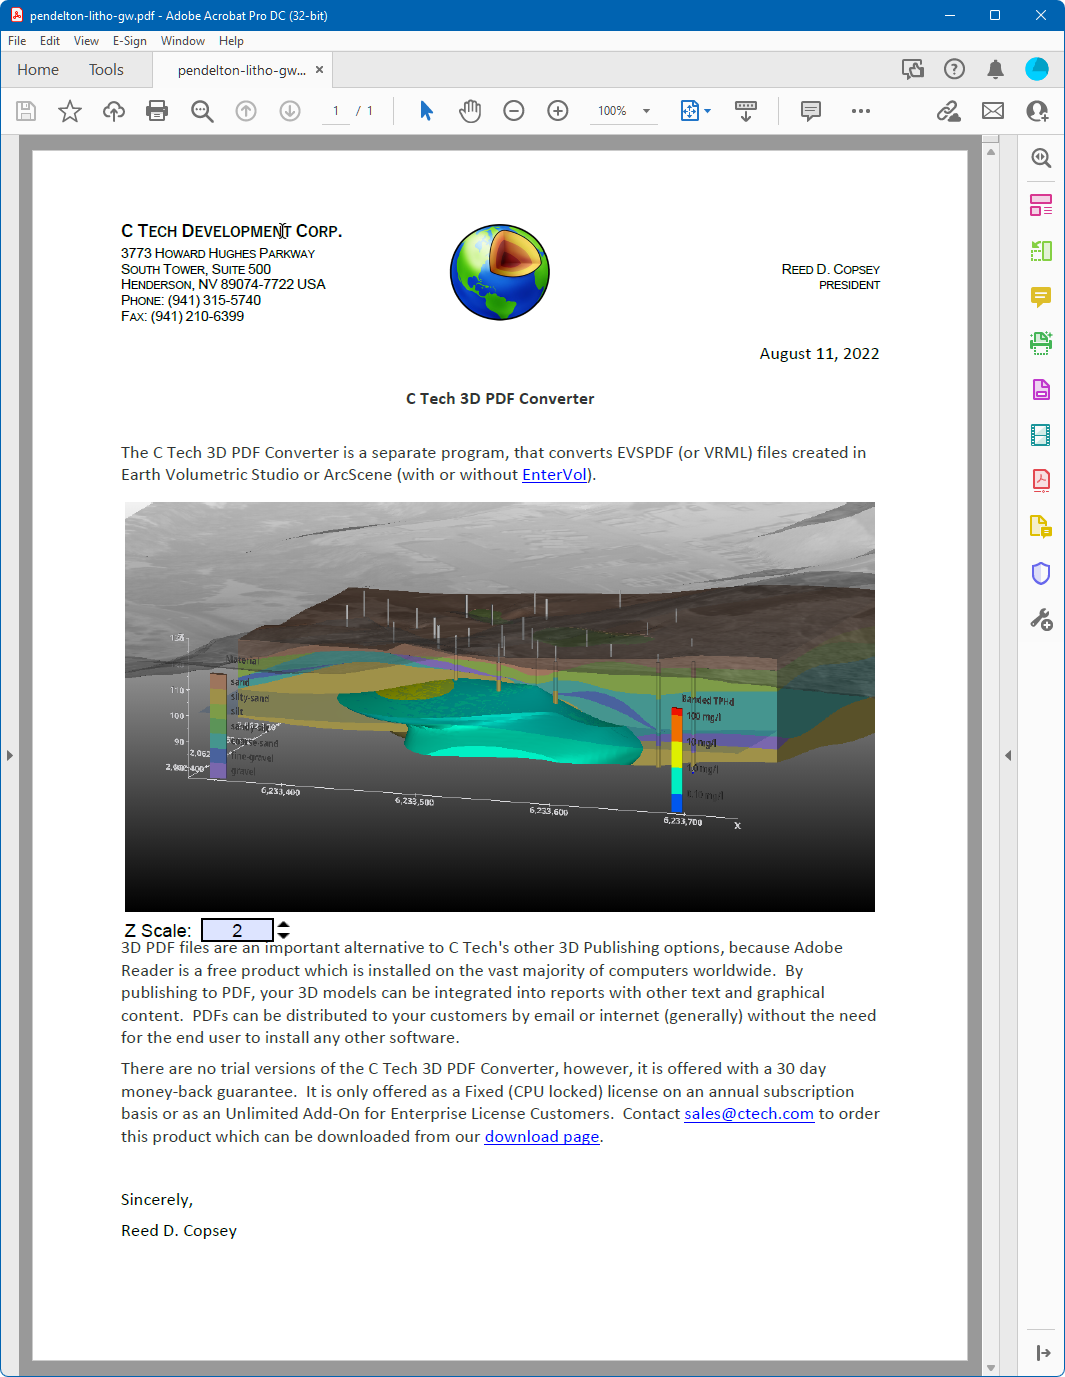
Note above, that we’ve turned on Include Z Scale Controls and we’ve set Z Scale as Created to be 2.0 which matches the Global Z Scale in our application.
The conversion takes only a few seconds, and when it finishes it displays this message:
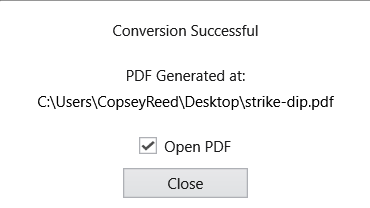
When you close this window, the PDF file opens in Adobe, however, that is for the next topic!
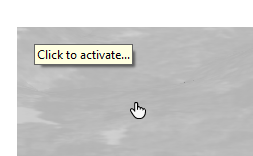
When you open a 3D PDF for the first time, you will likely see the Poster Image, and you may see that 3D content is disabled.
We are showing what may happen if your Adobe Reader (or Adobe Acrobat) settings do not have Enable playing of 3D content set to On.
You can choose to trust this particular document (one time or always)
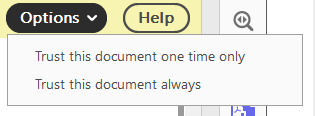
If we do the above, what we see is the Poster image. When we hover over it, Adobe Reader (or Acrobat) will display “Click to Activate”
But it is much better to change your Preferences. Choose Edit > Preferences to open these settings and turn on the selected option:
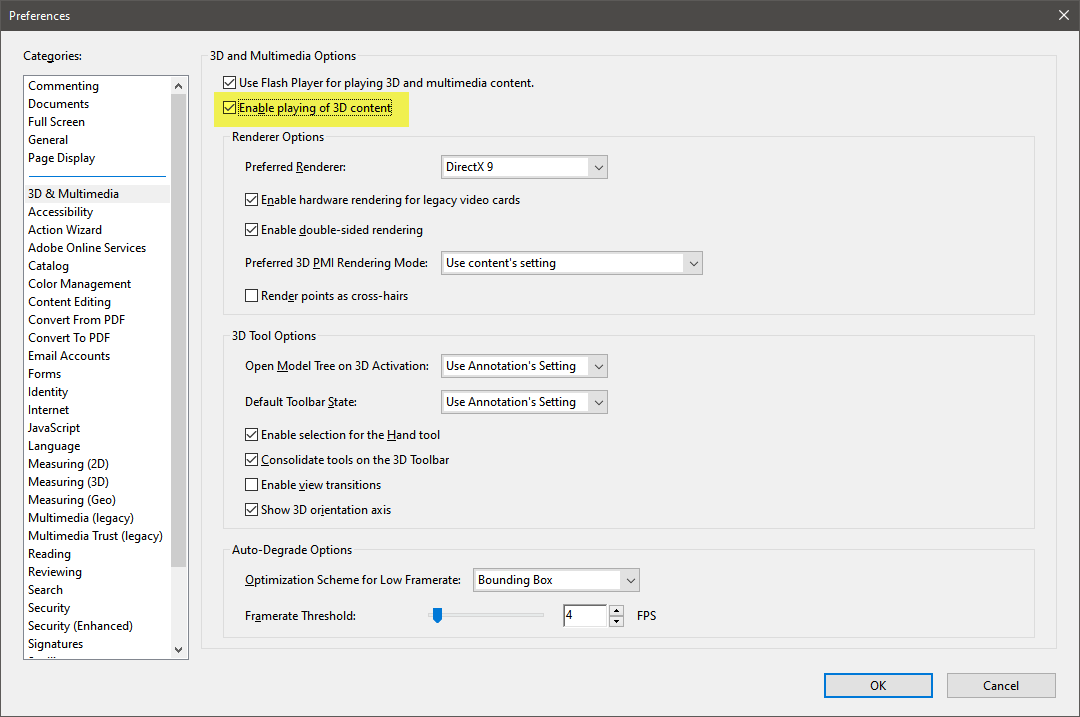
With the above settings, Adobe will always activate the 3D Content, but only once you “Click to Activate”
Notice in the view below that our Top and Bottom margins are larger than the specified Minimum Margin of 0.7".
This is because the aspect ratio of our EVS Viewer was wider (more landscape or panoramic) than the specified U.S. Letter paper size in Landscape (11" wide by 8.5" tall). For this scenario:
- 0.7" margins were applied to the Left and Right sides
- Larger margins were applied to Top and Bottom to avoid distortion of the Poster Image which was automatically created and included in the EVSPDF.
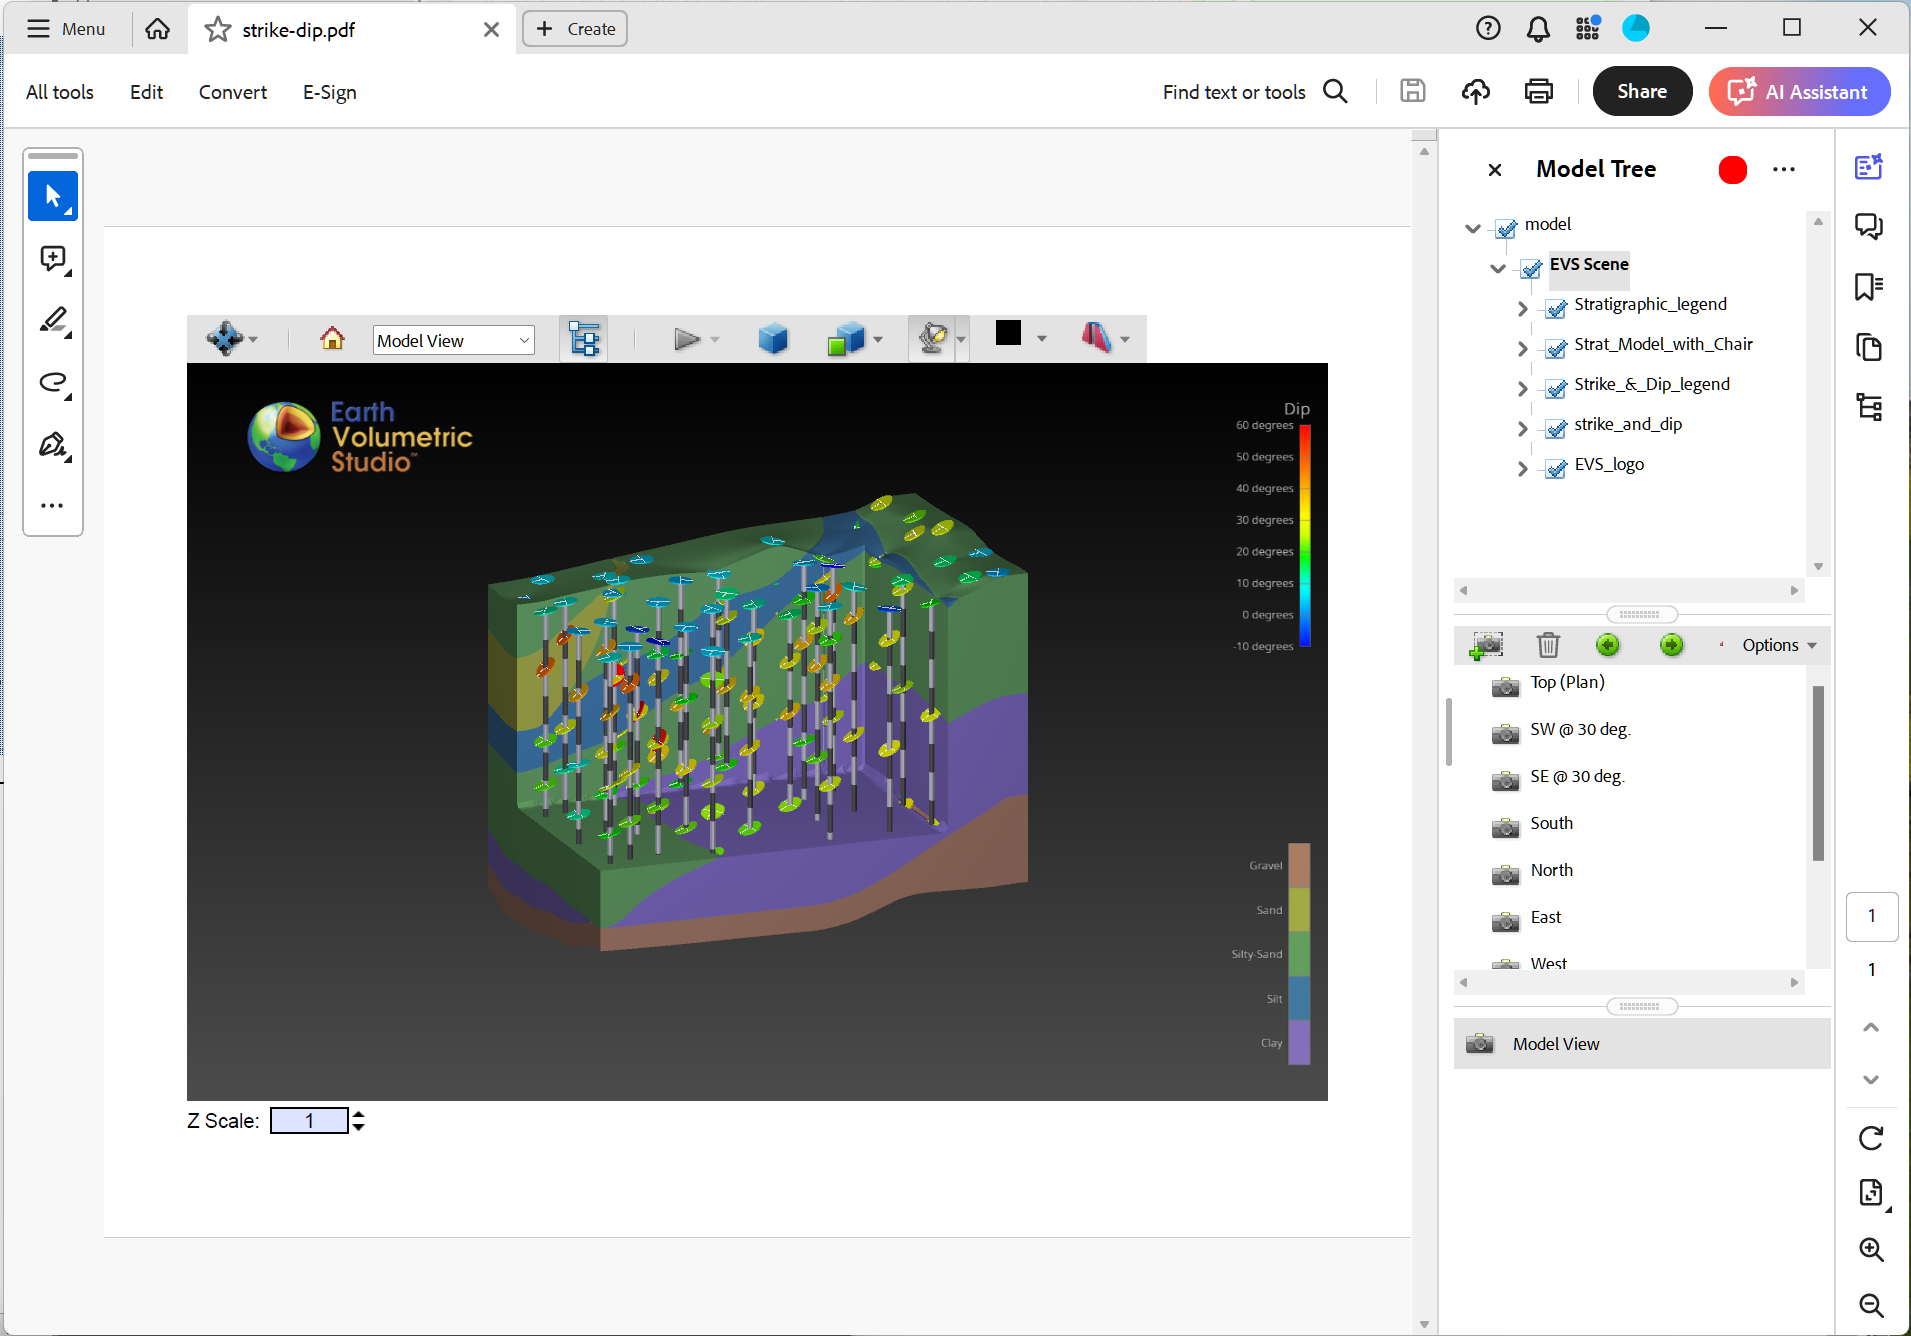
In the image below I have also expanded the Model Tree (Table of Contents).
If we turn off the Strat_Model_with_Chair object we see:
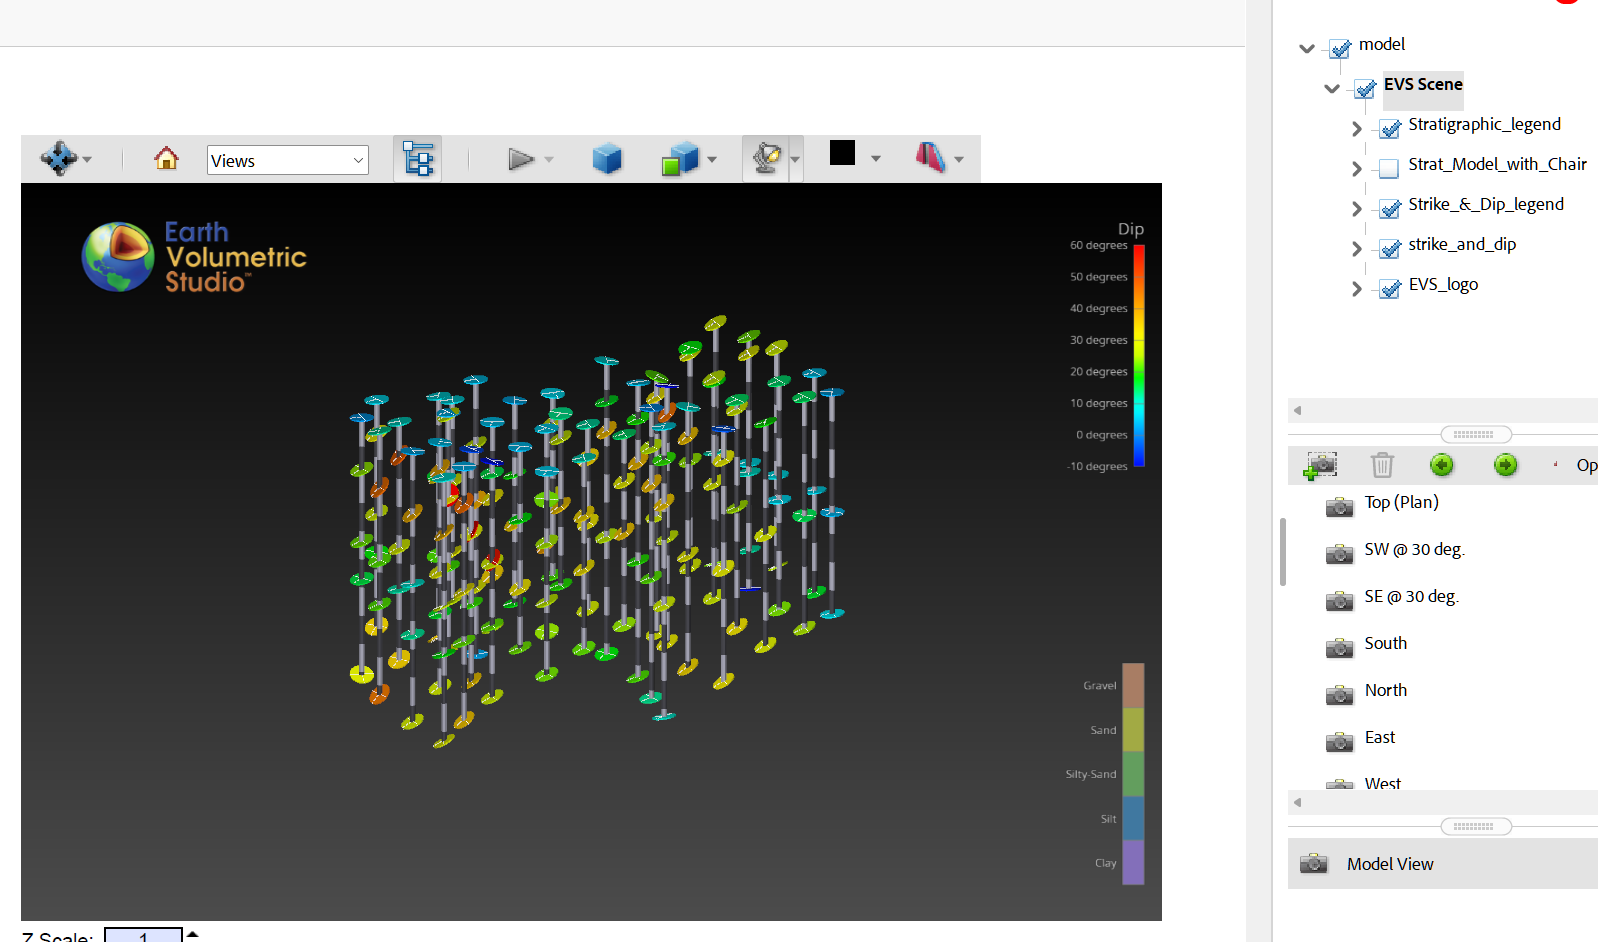
You can control the visibility of all objects in the ToC.
Finally, please notice the view buttons. If you created Bookmarked Views in EVS they will also be shown.
The Model View is the one shown in EVS when the EVSPDF was created.
An option for inserting 3D PDFs is to insert a placeholder 3D model into that report.
Info
If you want to put a FULL PAGE 3D PDF into an existing PDF file, the steps below are not required. Merely use the Prepend, Append or Insert at Page options.
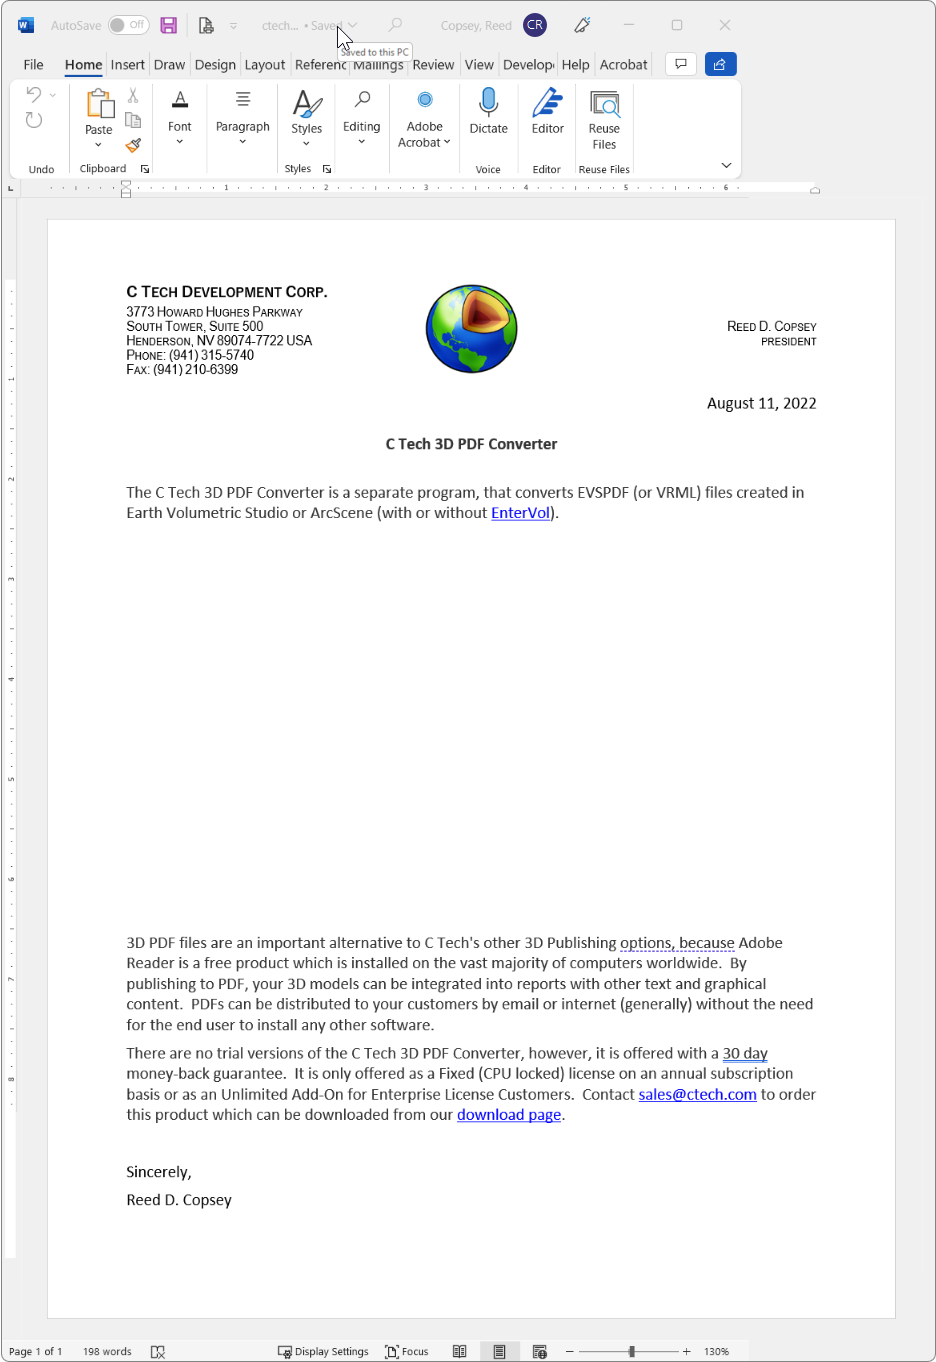
Using whatever software you wish, begin by leaving a blank space on the appropriate page where you’ll want the 3D model to be placed. The image below shows this in Microsoft Word:
Output the document to PDF in a normal manner (e.g. Save as PDF).
Open the PDF file in Adobe Acrobat Pro DC
Choose Tools, Rich Media, Add 3D
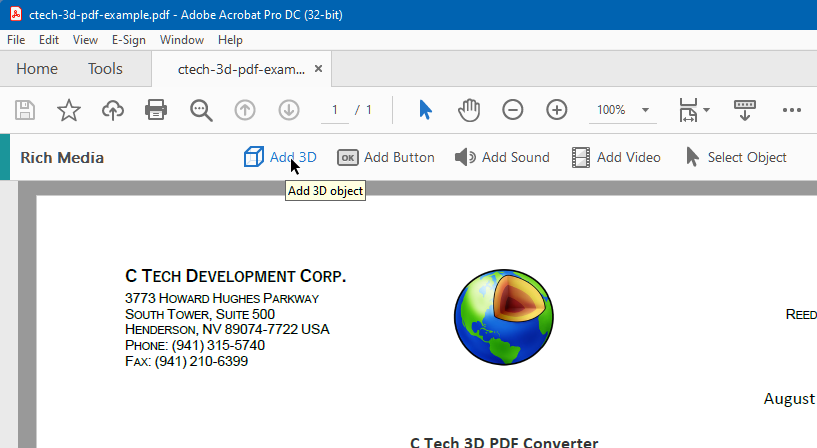
Select a rectangular area where you wish to place the 3D Model.
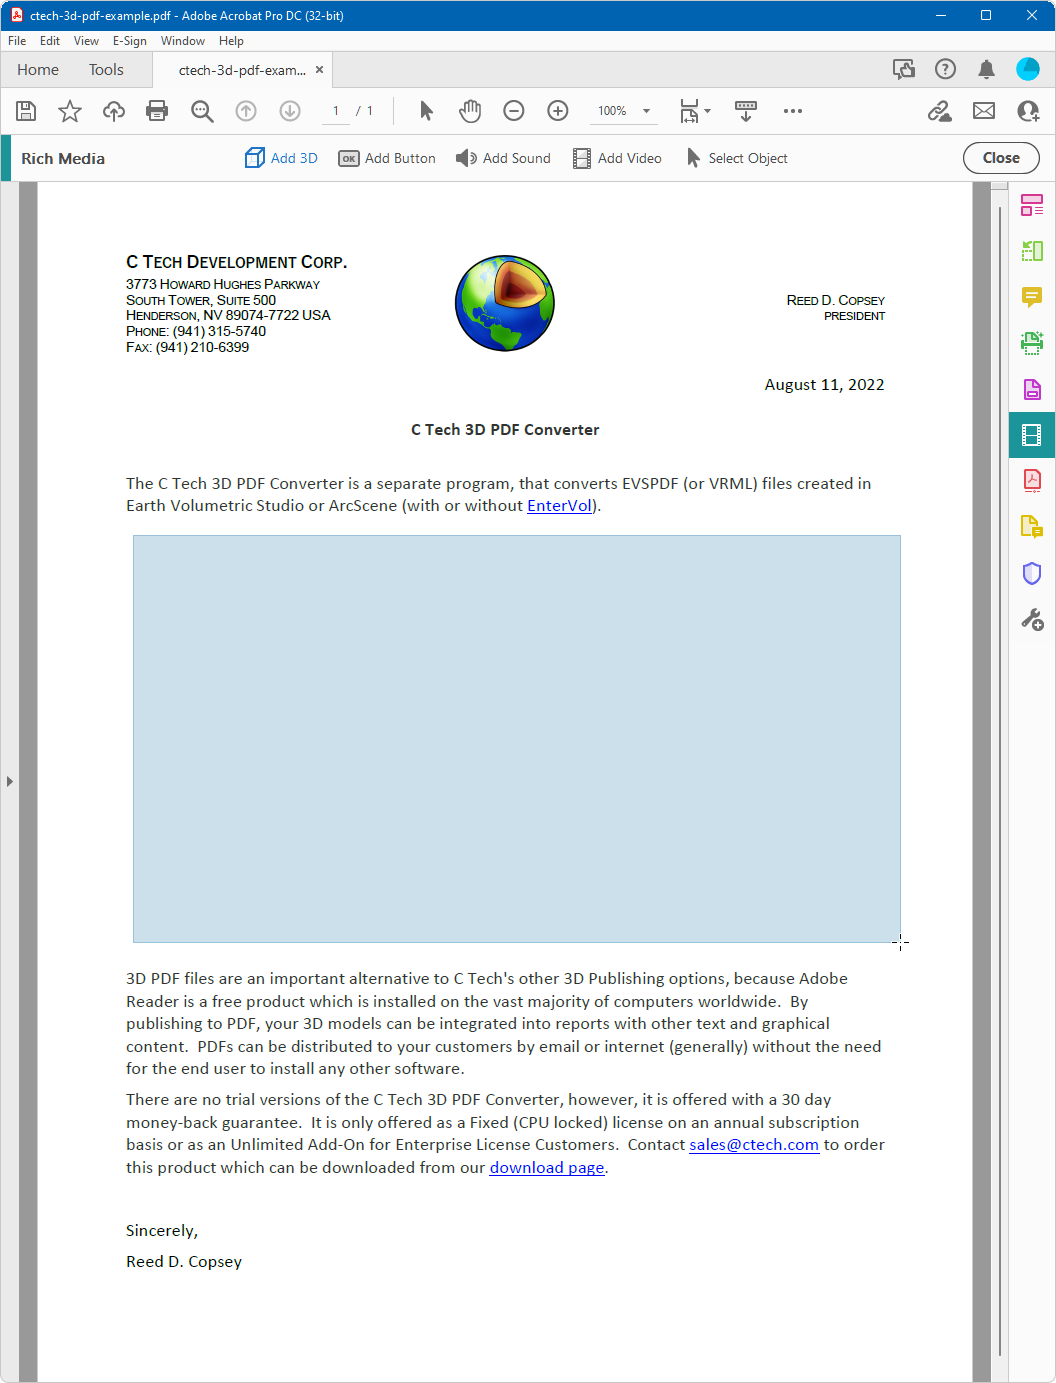
When done, it will prompt you for a file name. Click the Browse button and navigate to the ctech.u3d file:
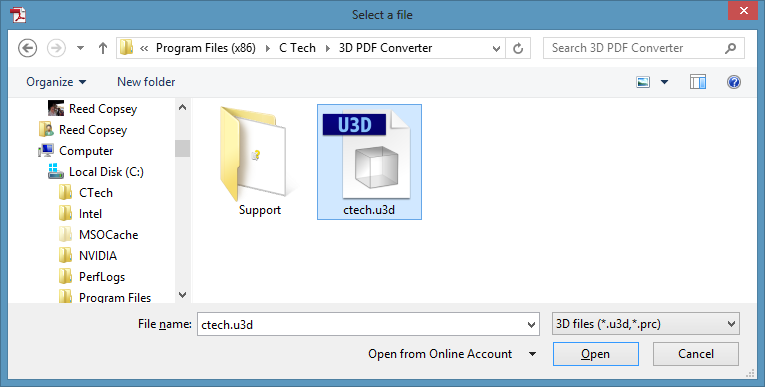
Select ctech.u3d and the Open button.
This will insert the placeholder 3D model into your document.
Repeat this process if you need additional 3D PDFs in the same document or save. You are now ready to replace your placeholder with a 3D PDF.
In order to replace the annotation (3D Model) in an existing PDF, we need to have a PDF file which has one or more 3D Models (or placeholders) existing.
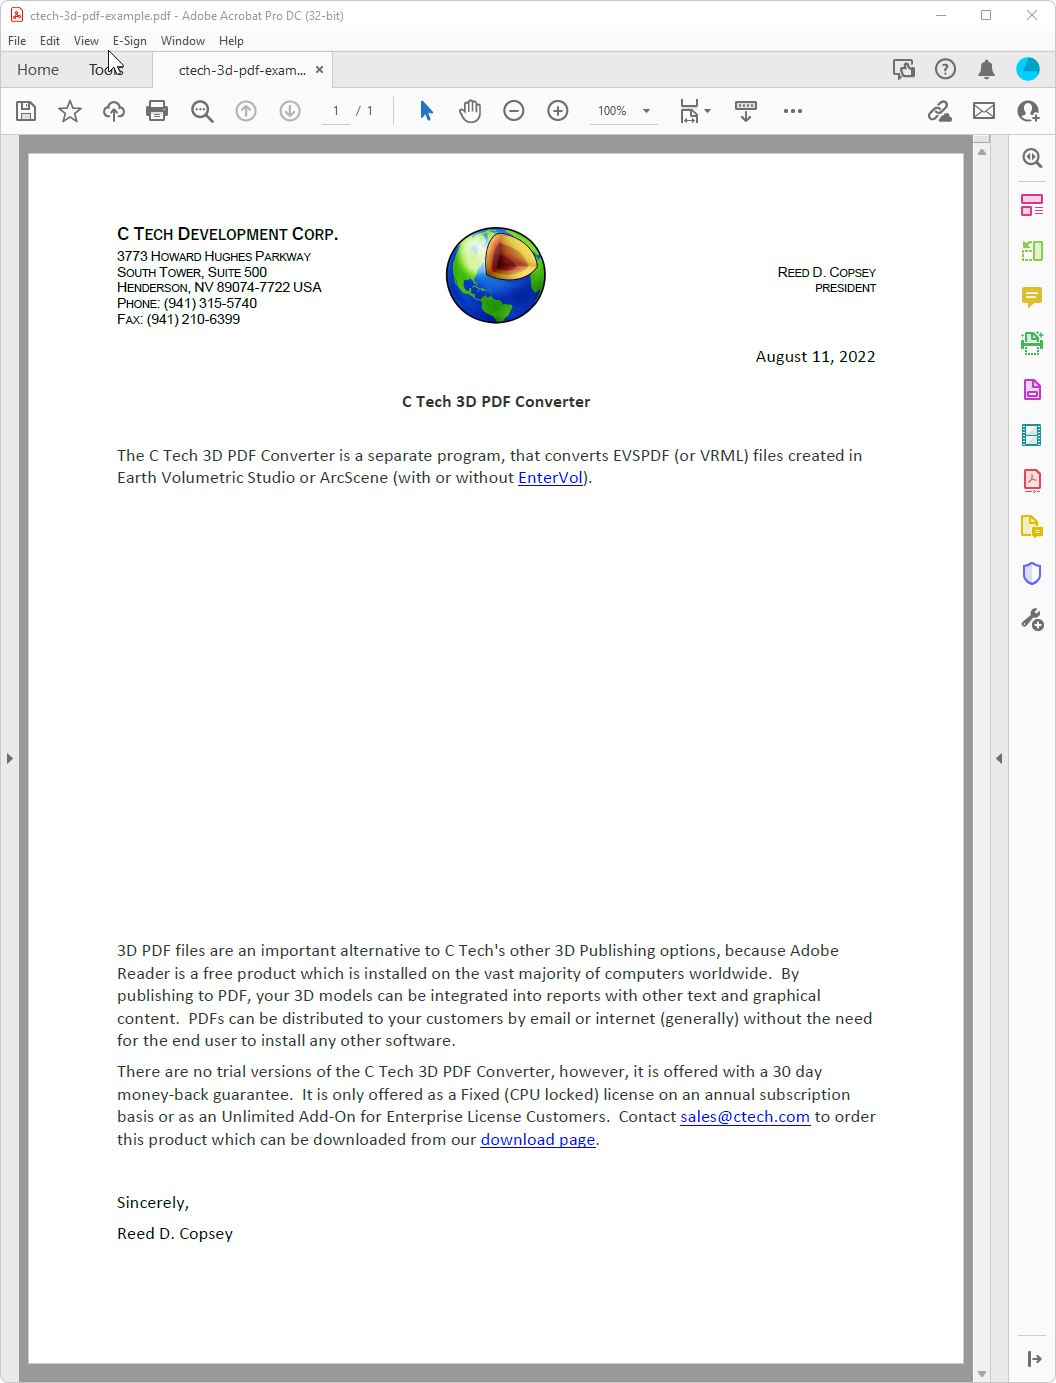
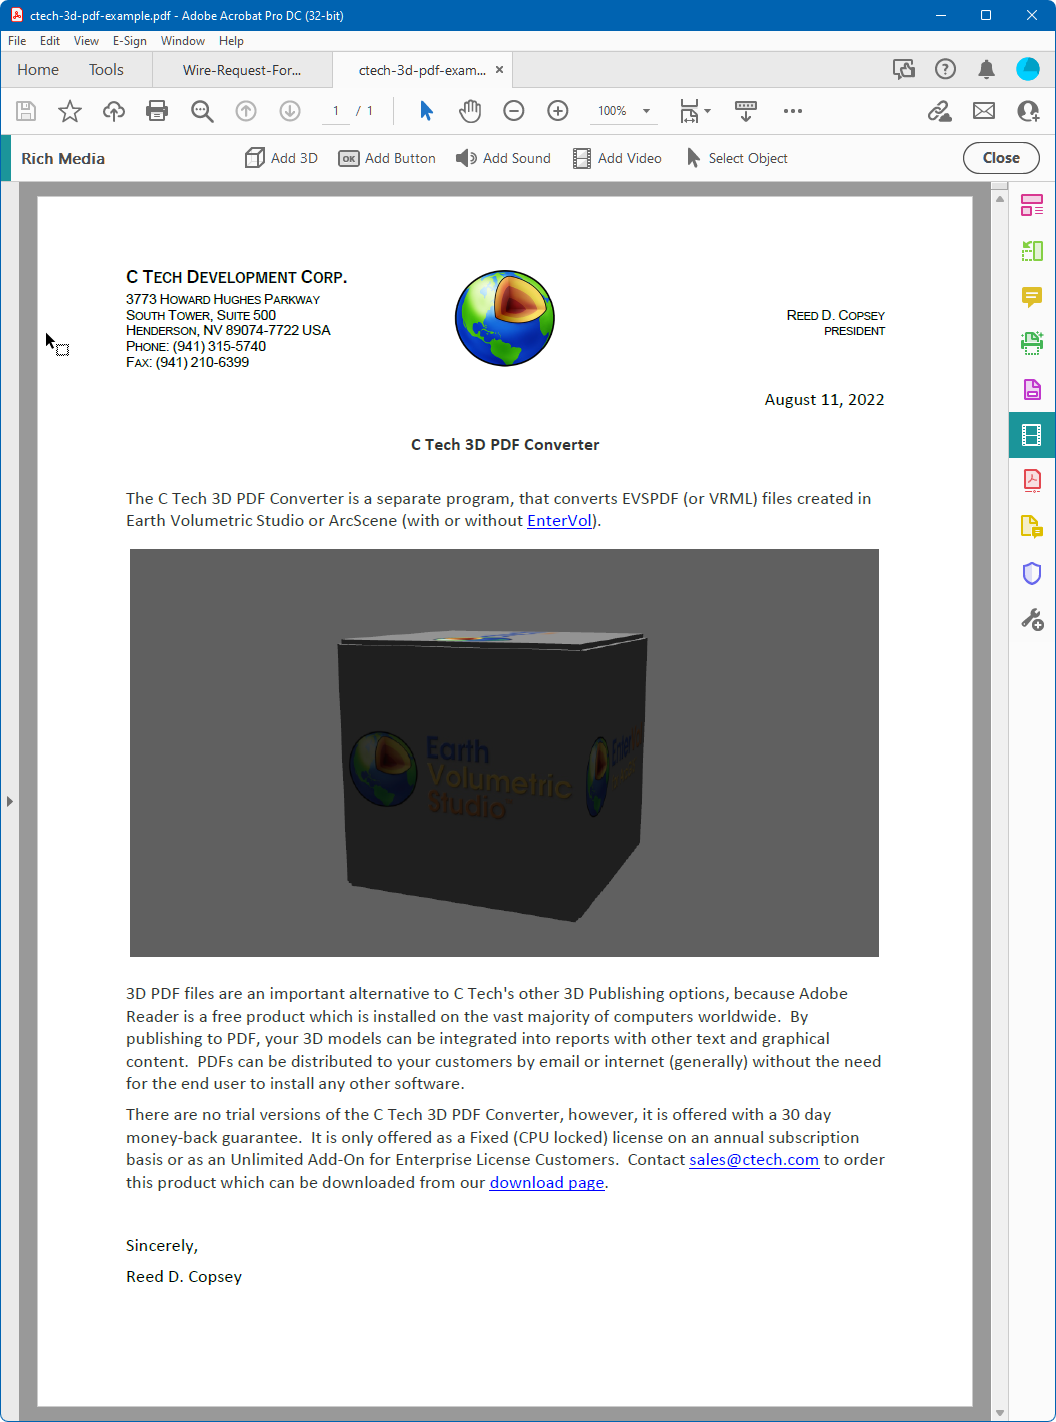
The page shown below is included with the installation of the C Tech 3D PDF Converter. The 3D models of C Tech logos are also included in U3D format. U3D and PRC are the 3D model formats that Adobe Acrobat Pro allows you to directly insert into an existing PDF file.
For more information on how to do this, please see Inserting 3D Models as PRC Files into Existing PDFs.
When replacing a “placeholder” 3D model with one of your own, you really only need to know the page that it is on and which 3D Model (annotation) it is on that page.
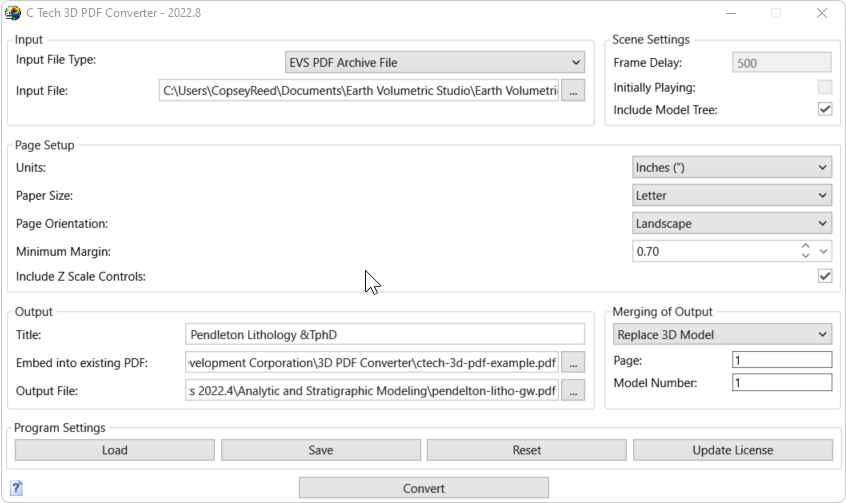
For the page above, these settings are shown in the converter settings shown below.
- You must specify ctech-3d-pdf-example.pdf as the Existing PDF into which we will replace the existing 3D Model.
- Note that we’re replacing the first (#1) Annotation on the first (#1) page. (there is only one)
- We’ve also changed the background colors.
- You don’t need to worry about matching the margins since it will replace the current size and position of the U3D which was previously inserted.
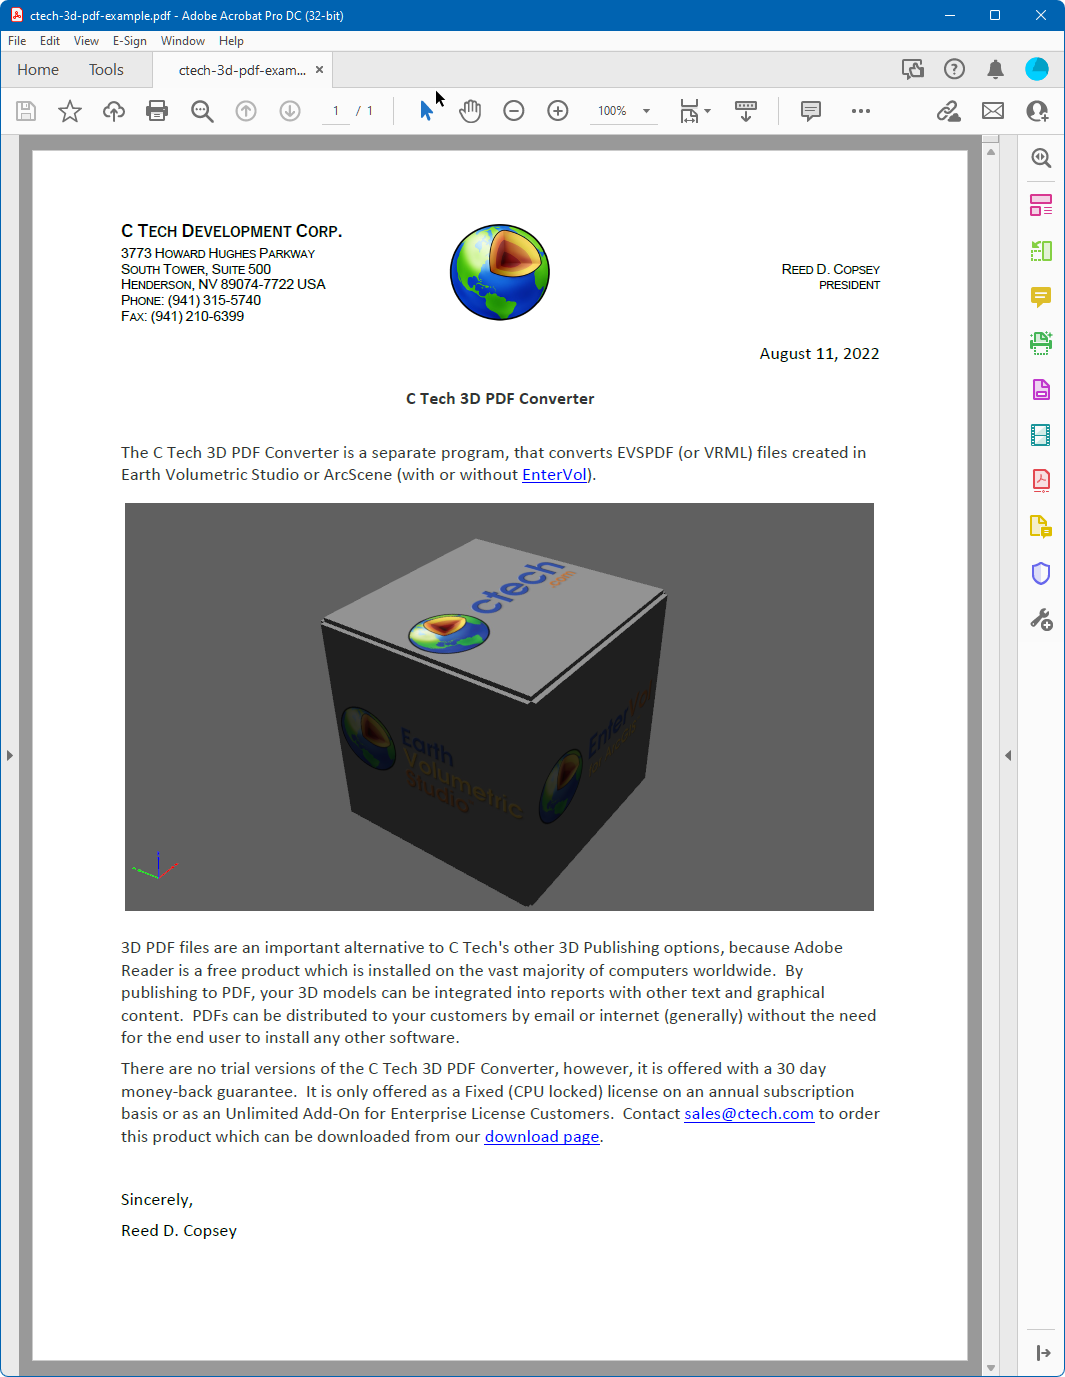
Upon converting, the resulting page (in Adobe Reader or Adobe Acrobat Pro) is:
The most direct method to put a 3D model into a PDF report is to first create a PRC file. The C Tech PDF Converter can output both PDF and PRC formats. PDF files can be immediately viewed as a 3D PDF, whereas PRC files must be inserted into a PDF file using Adobe Acrobat Pro.
Info
PRC files do not include lighting and other rendering information which we put into 3D PDFs. If you are unhappy with the quality of PRC output, you should use PDF.
Using whatever software you wish, begin by leaving a blank space on the appropriate page of a PDF file/report where you’ll want the 3D model to be placed.
Open the PDF file in Adobe Acrobat Pro
Choose Tools, Rich Media, Add 3D
Select a rectangular area where you wish to place the 3D Model.
When done, it will prompt you for a file name. Click the Browse button and browse to your PRC file as shown below:
The end result is shown below. When first viewed (or if viewed with software other than Adobe Reader or Adobe Acrobat Pro), you will see the poster image.
Once the user clicks on the image, it will show the 3D PDF
Below are a list of known issues and recommended workarounds:
- Conversion Fails
- Input and output files must be on a local drive or a network drive that is mapped to a drive letter.
- If you are overwriting an existing PDF, make sure that it is not open in Adobe Reader (or Acrobat). This will prevent overwriting and will not issue an error.
- 3D PDF Backgrounds in PDF document do not print correctly
- There is a problem with Adobe print drivers when printing a 3D PDF. Gradient backgrounds are printed as multiple bands
- Solution: Use a solid color background (top and bottom the same)
- 2D Overlay Objects are now included in 3D PDFs
- EVSPDFs supports all of the following objects.
- legend (2d): Use legend 3d instead.
- titles (2d): Use titles 3d instead.
- add logo
- VRML still does not support 2D Overlay objects
- Forward Facing Text will never be supported in 3D PDFs. Avoid using it in all modules (post samples, 3d titles, etc.)
- Adobe Acrobat Limitations on 3D PDFs which are beyond our control:
- The Measure Distance tool should only be used with your model at Z Scale = 1. It cannot compensate for vertical exaggeration as we do in EVS, so any distances that include a difference in Z coordinates will be incorrect.
- Transparency: Any object with Opacity < 1.0 will have a less than ideal rendering.
- Model Tree: There are two parent levels added to the model tree by Adobe: “model” and “EVS Scene”.